
A 40×80 steel-frame hay storage building gives farmers 3,200 ft² of clear-span, fire-resistant, low-maintenance space that keeps roughly 231 round bales nutrient-rich from harvest to feed-out by pairing smart design with hard-working moisture barriers. Readers learn to site the barn on high, well-drained ground, leave an 18-24 in. roof gap and east-west gable orientation for natural draft, and use ridge-and-eave vents plus thermostatically controlled fans to purge the moisture that bleeds protein, color, and digestibility from curing hay. The article walks through specifying Class I vapor retarders, EPDM or reinforced poly underlayments, silicone-sealed panel seams, self-adhering flashing, and correct fastener torque to stop condensation before it starts, then shows how quarterly inspections with moisture meters, infrared scans, and continuous sensor grids spot leaks long before mold or mineral streaks appear. Season-by-season vent adjustments, quick rust touch-ups, and strategic upgrades like DripStop membranes or automated fans are framed as small, fast investments that protect thousands of dollars in feed value and extend the life of the building itself.
Design Fundamentals for a 40×80 Hay Storage Building
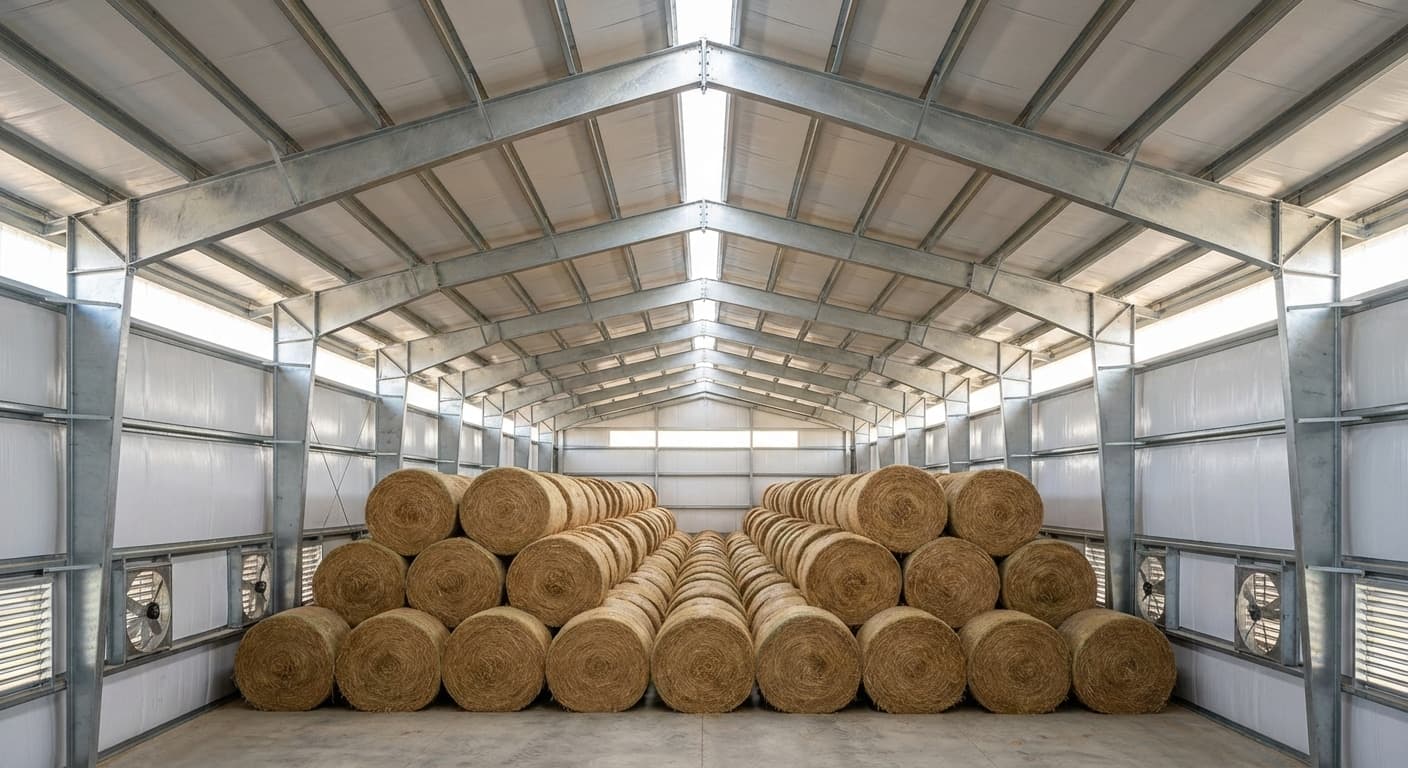
Steel frames give you 3,200 square feet of unobstructed space to store 231 round bales while protecting your hay from fire, wind, pests, and moisture damage.
Choosing the right steel frame for durability and cost-effectiveness
Your hay deserves better than rotting in a leaky pole barn. Steel frames give you the clear-span space you need–no posts blocking your loader, no columns eating up storage [1]. You get maximum bales per square foot at the lowest cost.
Budget $20,000-$25,000 for the frame on your 40×80 building [2]. That covers your primary I-beams and secondary supports (purlins and girts) that hold your roof and walls [2]. Yes, steel costs vary with market conditions and local codes. But here's what doesn't vary: steel's ability to protect your investment.
Fire can't touch it. Wind won't move it. Pests won't eat it. Moisture won't rot it [3]. Your agricultural steel building handles snow loads and ventilation systems without breaking a sweat [3]. Lower maintenance costs. Longer building life. Better hay protection. That's steel.
Optimizing interior dimensions to preserve hay quality
You've got 3,200 square feet. Use it right, or watch your hay spoil.
Leave two feet between your bales and rafters–that's your airflow corridor [4]. Stack bales against the walls? You just created a moisture trap that'll rot your feed. Keep those walls clear.
Your 40×80 building holds about 231 round bales (5-foot diameter, stacked three high) [5]. That's 21 square feet per ton of hay [5]. Want better density? Try pyramid stacking–it sheds water and maintains air gaps [4].
Fire safety demands 75 feet between buildings [4]. Equipment access needs wide aisles. Both protect your investment.
Build on high ground with good drainage. Even the best building can't fix a wet foundation [5]. Water wicks up through bales touching the ground, destroying nutrients from the bottom up. Smart placement prevents problems your moisture barriers have to solve later.
Integrating ventilation and lighting for nutrient retention
Bad airflow ruins good hay. Your ventilation system is the difference between quality feed and expensive compost.
Ridge vents paired with eave openings create the natural draft that pulls heat and moisture up and out [6]. Your 40×80 building needs this continuous airflow–hay releases moisture as it cures, and trapped humidity means mold.
Add thermostat-controlled fans for insurance [8]. When temperatures spike, fans kick on automatically. No nutrient breakdown. No spontaneous combustion. Just stable conditions.
Face your gable ends east-west for maximum cross-ventilation without storm exposure [8]. Morning and evening light enters without cooking your hay at noon.
Skylights cut electric bills while giving you inspection light [7]. Use vapor-proof LEDs where you need artificial lighting–regular fixtures fail in humid conditions. Keep lights away from hay to prevent hot spots that degrade nutrients.
Get these basics right, and your hay keeps its protein, color, and digestibility from harvest to feeding [6]. The seasonal ventilation adjustments covered in Section 5 build on this foundation–but without proper initial design, no amount of adjustment helps.
Effective Moisture Barrier Strategies
Class I vapor retarders installed on the warm side of your building stop condensation before it damages your hay and feed quality.
Selecting high-performance vapor retarders for a 40×80 hay storage building
Your hay's nutritional value depends on keeping moisture out–and vapor retarders are your first line of defense. For your 40×80 storage building, you'll want Class I vapor retarders (0.1 perms or less) that stop condensation before it damages your feed [9].
Choose polyethylene sheets for cost-effective coverage that still delivers reliable moisture protection. EPDM roofing material offers another proven option–farmers report zero moldy bottom bales when storing directly on concrete floors protected by EPDM [10]. For the strongest protection, reinforced polyethylene systems with seaming tapes and pipe boots create a continuous barrier with no weak points [11].
Install your vapor barrier on the warm side of the building–inside for cold climates, outside for hot and humid regions [9]. In your 40×80 building, extend barriers fully under storage areas and minimize seams. Every connection point risks failure, so consider custom-fabricated sheets up to 200 ft x 200 ft that reduce field seams significantly [11]. Seal every seam with compatible tapes or adhesives, paying extra attention around utilities and structural penetrations.
Your investment? About $300-$500 for materials–a fraction of what you'd lose from moldy or degraded hay [10]. That's smart protection for your feed quality and your bottom line.
Installing insulated panel systems to prevent condensation
Condensation ruins hay–but the right insulation system stops it cold.
Your 40×80 building faces a simple physics problem: warm air holds moisture, cold metal surfaces attract it [12].
When humid air hits your cold
Applying sealants and flashing for airtight enclosure
Your metal panels stop most moisture–but the seams between them need extra attention. These connection points make or break your hay storage success [15]. Use silicone or butyl caulking on every vertical and horizontal overlap. Target ridges and valleys where water pools naturally. Add foam closure strips at eaves and ridge caps to block wind-driven moisture that destroys hay nutrients.
Flashing directs water away from your stored hay at every vulnerable junction. Install metal flashing at roof-to-wall transitions, foundation connections, and around all ventilation openings [15]. Self-adhering flashing membranes offer the best protection at complex joints, creating one integrated moisture defense system with your vapor barriers [15].
Don't wait for problems–schedule quarterly inspections (detailed in the maintenance section). Look for separated caulking, cracks, or deterioration at every seam [6]. Fix problems immediately. Even small leaks trigger mold growth that ruins hay quality fast. This proactive approach protects both your building investment and your feed value–because once moisture gets in, nutrient loss follows quickly.
Installation Best Practices and Quality Assurance
Proper fastener installation using torque wrenches and manufacturer specs creates weatherproof seals that protect your hay through every season's temperature and humidity changes.
Step-by-step erection process with single-source coordination
Your 40×80 hay storage building goes up fast when you work with a single-source contractor who owns every step. The process starts with columns or preassembled frames, then adds rafters if needed [16]. Your crew installs the secondary framing–wall girts and roof purlins–that holds your exterior panels, then finishes the end walls [16].
Temporary bracing keeps everything stable during construction, with sidewall supports in place before any rafters go up [17]. Your building gets squared and plumbed perfectly before panel installation–this precision now saves you money and headaches later [17]. Next come windows, doors, wall panels with insulation, roof panels with insulation, and finally the trim and flashing that seal out moisture [16].
With an experienced crew, your building takes shape in just 3-6 days [16]. Single-source coordination means one phone call, one schedule, one point of contact when you need answers–exactly how
Ensuring proper alignment and fastener integrity
Every fastener in your hay storage building serves double duty–holding structure and blocking moisture. When fasteners get tightened just right, they create an even seal that keeps water out and your hay dry [18]. Too loose? Water seeps in.
Too tight? You strip threads, crack panels, or crush the rubber washers that seal out rain [19]. Your best protection comes from following manufacturer specs exactly–different fasteners need different tightening based on size, coating, and location [19]. Smart installers use torque wrenches instead of impact drivers for critical connections, especially where panels overlap and moisture loves to sneak through [18].
Your hay storage faces constant temperature swings and humidity changes that make metal expand and contract. Get the installation right the first time, and those fasteners keep working through every season. After installation, check that panels line up perfectly and fasteners sit flush–any gaps or raised edges become water entry points that damage your valuable hay [19].
Post-construction inspections to verify moisture protection
Your post-construction inspection makes the difference between hay that keeps its nutrients and hay that loses value to hidden moisture. Walk through with your contractor to check every moisture barrier against specs and building codes [21]. Pay special attention to the trouble spots–seams, foundation edges, and anywhere pipes or wires go through walls [22]. Look for tears, holes, or loose spots in vapor barriers that let moisture attack your hay [22].
Make sure barriers cover everything with no gaps, and check that sealing tape still sticks tight at every overlap [22]. Test fasteners and tape for rust or looseness that could let barriers move over time [22]. A moisture meter catches problems you can't see–use it to find high humidity before it ruins hay quality [22]. Take photos and notes of everything you find so repairs happen fast [22].
After big storms, check again for new leaks before moisture reaches your hay [20]. These simple checks protect the nutrients your livestock need and the investment you've made in quality feed.
Maintenance, Monitoring, and Long-Term Performance
Quarterly moisture checks with simple meters catch hidden water damage before it destroys hay nutrients and costs you money.
Routine checks for barrier integrity and early leak detection
You protect your hay investment with simple quarterly checks that catch problems before they cost you money. Walk your building every three months, looking for water stains, white mineral deposits, or cracking sealants on roof panels, walls, and foundation edges [23]. But here's what most farmers miss–moisture hides behind surfaces long before you see damage [24].
That's why smart operators use moisture meters on walls and ceilings, especially where water loves to sneak in first [24]. For high-value hay storage, continuous monitoring systems pay for themselves by alerting you the instant moisture breaks through. Grid sensors pinpoint exactly where to fix the problem–no guessing, no wasted time [23].
Infrared cameras reveal another layer of protection, showing wet insulation or trapped humidity your eyes can't see [25]. Focus your checks on the vulnerable spots: panel seams, flashing edges, and anywhere pipes or wires penetrate your moisture barriers (covered in Section 2) [24].
Keep simple moisture maps of problem areas. These visual records show patterns over time, helping you fix issues before they damage hay nutrients [24]. Your
Seasonal adjustments to ventilation for optimal nutrient preservation
Your ventilation strategy changes with the seasons to keep hay nutrients locked in. Summer's simple–open everything wide. Ridge vents, side panels, all of it. Hot air rises out, taking damaging humidity with it [26]. Add portable fans during muggy spells to push moisture out before it damages protein content.
Spring and fall need finesse. Close vents on the wind side halfway while keeping outlets open. This balances airflow without the temperature swings that create condensation [27]. Winter's the trickiest–you need just enough ventilation. Keep upper vents cracked to let moisture escape without flooding your building with cold air that creates condensation on warm hay [26].
Remember that 18-24 inch gap between hay and roof we discussed in Section 1? That spacing works year-round, letting air flow even when you adjust external vents [26]. Check weekly for condensation on metal surfaces or musty smells–your building's telling you to adjust the vents [28].
This isn't complicated. You're managing airflow to prevent the moisture and heat that destroy protein content and create toxic mold. A few vent adjustments through the year protect thousands of dollars in feed value.
Cost-effective repairs and upgrades to extend building life
Fix small problems now or pay for big repairs later–it's that simple. Walk your building regularly, tightening loose bolts and patching tiny leaks the moment you spot them [6]. Touch up rust spots immediately with proper coatings. Once corrosion starts eating steel, repair costs multiply fast.
See a damaged roof panel? Replace it now. Every drop that reaches your hay costs you in lost nutrients and potential buyers. Smart upgrades pay you back quickly. Thermostatically controlled fans kick on automatically when temperatures spike, stopping the chemical reactions that destroy hay quality and create fire risk [29].
For older buildings without full insulation (discussed in Section 2), DripStop membranes offer budget-friendly protection. They catch condensation before it drips on hay–much cheaper than retrofitting complete insulation systems [30].
When replacing fasteners, torque them right. As covered in Section 4, both loose and over-tight connections fail, compromising your moisture barrier [6]. After heavy snow, clear your roof to prevent structural stress. Keep drainage flowing away from foundations–standing water accelerates rust from the ground up.
These aren't expenses. They're investments that keep your steel building protecting hay value for decades. A few hours of prevention saves thousands in repairs and lost feed quality.
- Steel clear-span 40×80 frames cost ~$20-25k and eliminate interior posts for max bale density.
- Leave 2 ft rafter gap and keep bales off walls to stop moisture traps and mold.
- Use Class I vapor retarders (≤0.1 perm) and seal every panel seam to halt condensation.
- Quarterly checks with moisture meters and IR cameras catch hidden leaks before hay spoils.
- Adjust vents seasonally: full summer opening, half-closed spring/fall, cracked winter to curb mold.
- Replace damaged panels and retorque fasteners immediately; small fixes prevent costly nutrient loss.
- https://thedairylandinitiative.vetmed.wisc.edu/feed-center-design/bale-storage/
- https://extension.okstate.edu/fact-sheets/round-bale-hay-storage.html
- https://stablemanagement.com/articles/keeping-hay/
- https://www.energy.gov/energysaver/vapor-barriers-or-vapor-retarders
- http://thesmallhorsefarm.blogspot.com/2021/11/epdm-moisture-barrier-for-hay-storage.html
- https://www.reefindustries.com/vapor-retarders.php
- https://lionbuildings.com/how-to-prevent-condensation-in-metal-walled-livestock-buildings/4/
- https://www.wickbuildings.com/blog/how-to-prevent-condensation-under-a-metal-roof-the-enemy-within/
- https://www.abcmetalroofing.com/blog/podcasts/a-simple-solution-to-metal-panel-condensation-in-non-insulated-buildings/
- https://extension.illinois.edu/blogs/ag-engineering-update/2019-05-20-condensation-prevention-metal-walled-livestock-buildings
- https://www.buildingsguide.com/build/metal-building-construction/?srsltid=AfmBOorOP_J5BGIGGSk_dh8ub5L9_vmaWvylSajN-eQaEzgr4KXtYyif
- https://norsteelbuildings.com/steel-building-design-construction/steel-building-step-by-step-assembly-guide/
- https://allfasteners.com/news/post/the-importance-of-proper-torque-and-tightening-techniques?srsltid=AfmBOoqITsxRiCpOv36W4Ybe2vo9NTQIPRGRpeKoVKheZgBErUhhqGOg
- https://www.mudgefasteners.com/news/torque-in-fastener-installation
- https://www.raberstoragebarns.com/blog/storage-building-maintenance-checklist/
- https://www.altaconstruction.com/news/post-construction-checklist/
- https://waldercrawlspace.com/blog/essential-vapor-barrier-inspection-checklist-for-homeowners/?srsltid=AfmBOor_g4bOTneUPkNi9NNVYNEYqILj6d6l9bKVYNRBWVGgy5lSIYnX
- https://detecsystems.com/permascan-moisture-monitoring-and-leak-detection-system/
- https://tramexmeters.com/learn/moisture-testing/commerial-building-and-home-inspections
- https://inspec.com/thermal-moisture-diagnostics/
- https://americansteelinc.com/blog/hay-storage-metal-barn-solutions/
- https://perkcosupply.com/hay-storage/
- https://covermorebuildings.com/hay-storage-with-pvc-storage-shelters/