
A 40×80 steel barn only assembles like clockwork if the anchor bolts land within 1⁄16", and this article shows how pre-pour plywood or steel templates, a three-check verification system, and a three-page bolt plan–summary, plan diagram, and configuration drawings–lock every bolt in place before the concrete sets, eliminating the expensive drilling, re-threading, or slab-breaking that derails framing day. Readers learn to share the bolt plan, foundation reactions, and OSHA erection notes with the concrete contractor and foundation engineer up front, sequence underground utilities and site access before the pour, and use j-bolts or threaded rods in rigid steel templates to survive vibration, ensuring columns seat cleanly when the kit arrives. Post-pour, it walks through permitted field fixes, torque checks, grouting, and sign-off documentation that satisfy ACI/AISC, then explains how recording surprises–bolt grade mix-ups, out-of-level slabs, hidden walk-door conflicts–turns the first build into a faster, cheaper second project when you return to the same single-source supplier for future bays.
Understanding Anchor-Bolt Templates
Anchor bolt templates lock your pattern in place before concrete sets, preventing costly fixes like drilling new holes or re-threading bolts on framing day.
Why precise templates matter for a 40×80 steel barn kit
Your 40×80 steel barn kit arrives precision-made–every baseplate, column, and beam fits together like clockwork. But that precision only works if your anchor bolts match the exact pattern built into those baseplates. These bolts do double duty: they hold your steel steady during assembly and transfer loads from the frame to the foundation. [1] Think of your building as a kite in high winds–the anchor bolts and footings keep it planted. [1]The margin for error?
Smaller than you think. Your bolts need to hit within 1/16" of their target, stay within 1/4" diameter variance, and sit within 1/2" of the same height. [2] Get it wrong and your columns won't seat on framing day. The fixes–drilling new holes, adding extensions, re-threading high bolts, or worst case, breaking up concrete–cost time and money you didn't budget for. [1]Templates prevent these headaches by locking in your bolt pattern before concrete touches the ground.
You slot each bolt through pre-drilled holes in the template–plywood or steel plate–and the whole group stays aligned while concrete cures. Check three times: before fixing the template, after securing it, and right after the pour. Once that concrete sets, fixing mistakes gets expensive fast. [1]
Key components of a template package
Your anchor bolt plan comes in three pages that work together. First, the anchor bolt summary lists every bolt you need–diameter, quantity, and location (endwall columns, rigid frames, door openings). It specifies bolt projection: how much thread sticks above your slab to fit the baseplate and leave threads showing above the nut. For your 40×80 building, expect 5/8" bolts projecting 2" and 3/4" bolts projecting 2½". [3] Get this wrong and framing day stalls–nuts bottom out before baseplates seat properly.Second comes the plan diagram–your building on a grid.
Letters mark endwalls, numbers mark sidewalls. Simple symbols show bolt sizes–circles for one diameter, X-marked circles for another–so your crew knows which bolt goes where without flipping pages. [3] Watch for marked cable-bracing bays: put a door there and you'll redesign your whole lateral system.Third, you get bolt configurations–labeled A through E–showing baseplate dimensions, bolt counts, and exact distances from wall lines. [3] Your concrete crew works from these details, not guesswork. Each configuration spells out bolt diameter, spacing, and which way columns face. No confusion about C-channel orientation or edge distances.
The summary also includes building reactions (load values) your foundation engineer needs to size footings and set bolt length–typically 20 times the bolt diameter. [4] Share the complete package with both your concrete contractor and foundation engineer upfront. It keeps everyone moving.
How templates streamline site layout and reduce errors
Templates turn paper plans into something your crew can actually use. Instead of measuring each bolt spot from scratch, they slot bolts through pre-drilled holes and move the whole group together. Once bolts lock into the template, spacing errors disappear. Those simple symbols (circles and X-marks) carry through all three pages, so your crew confirms bolt sizes instantly–no page flipping while concrete sets. [2]
Steel templates beat plywood for a critical reason: they don't flex under vibration. When you consolidate concrete, plywood lets bolts tilt. Steel holds them at exactly 90 degrees. [5] Your three-checkpoint system–before fixing, after securing, immediately after pour–actually works because bolts can't drift between checks. [2] Do this right and framing day runs smooth. Your steel building goes up as planned, not as a puzzle.
Pre‑Construction Planning for Framing Success
Distribute complete anchor bolt plans, foundation designs, and reactions data to your concrete contractor and crew simultaneously to eliminate costly field fixes during framing.
Coordinating foundation layout with bolt templates
Here's what trips up first-time builders: your anchor bolt plan isn't a foundation design. It's a placement guide. [2] That distinction drives your entire pre-construction sequence.
Your foundation engineer needs two things from you: the bolt plan (showing where each bolt group sits) and the building reactions data (the actual forces your 40×80 frame puts on each column). [2] We provide both, but they serve different masters. We spec the bolt type, diameter, and quantity based on your building design. Your foundation engineer takes those specs plus your soil conditions and local codes to determine bolt length–minimum 20 times the bolt diameter. [2]
This split responsibility creates a critical handoff point. The concrete contractor owns getting the right bolts in the right places. But you–or your erection crew–own verifying everything's correct before steel goes vertical. [2] Miss that verification window and you're looking at expensive field fixes on framing day.
The solution? Get the complete package–bolt plan, foundation design, and reactions data–into everyone's hands at once. No sequential handoffs, no telephone game. [2] When your concrete contractor and foundation engineer work from the same documents on the same timeline, you eliminate those schedule gaps that push steel delivery past foundation cure. Because a kit sitting on-site while concrete cures isn't progress–it's storage fees.
Communicating template dimensions to the erection crew
The best bolt plan in the world is worthless if your crew can't read it through concrete dust and morning drizzle. That's why smart foremen work from paper, not tablets. [6] Print multiple sets of your three-page anchor bolt plan. Hand separate copies to your concrete contractor and each crew member working a column line. No sharing, no waiting, no confusion when concrete's setting and time's burning.
Your plan's visual coding system–detailed in the earlier section–keeps things moving fast. But here's what matters for field execution: every crew member can verify bolt type at a glance without shuffling papers. [3] That speed saves money when you're racing daylight and concrete cure times.
The real coordination challenge isn't the paperwork–it's making sure your crew understands column orientation before they set a single bolt. Those configuration drawings show more than bolt spacing. They dictate which way your C-channel faces, how your column web aligns with the wall line. [3] Get it wrong and columns won't seat, period.
Walk doors create their own headache. Since they're field-located and missing from the anchor bolt diagram, you need a separate conversation about placement before concrete goes in. [3] Put a door in a cable-braced bay and you'll redesign your entire lateral system on your own dime. One missing dimension can idle a crane crew for hours while you scramble for answers. [6]
The fix? Direct conversation between your bolt plan holder and your steel setter–before the foundation pour, not during. When you work with
Checklist for site readiness before framing begins
Your framing day success hinges on what's actually done, not what you think is done. Here's your go/no-go checklist in the order problems will bite you:
Foundation and concrete: That dry-looking slab might still be curing inside. Schedule steel delivery only after full cure–premature loading cracks pads and budgets. [7] Run your final bolt check now. Every deviation you catch today costs pennies compared to field fixes tomorrow. [8]
Soil and drainage: Water pooling near footings after rain? Fix it now or watch it worsen when your roof concentrates runoff. [7] Grade away from the building. Install erosion controls. Simple steps that prevent expensive foundation problems.
Utilities: Every underground line–water, electric, sewer, gas–goes in before concrete. [7] Miss one and you're jackhammering later. Triple-check your stubs are set and capped.
Access and staging: Your crew needs room to work. Clear staging for frame layout. Open paths for cranes and trucks. [7] Limited access adds half-days to your schedule and hundreds to your crane bill. Map it out now.
Permits and inspections: That foundation inspection isn't a suggestion–it's law in most jurisdictions. [9] Schedule it early, not the morning steel shows up. One phone call prevents a full crew standing idle.
Crew readiness: Check weather, check lighting, check that every worker has their own bolt plan printout. [8] No sharing PDFs on phones. No guessing in dim light. Set your crew up to win.
Each item is pass/fail. No gray area. One unchecked box stops your entire operation cold. That's why our process builds these checks into the timeline from day one–keeping your project moving and your budget intact.
On‑Site Execution: Using Templates to Avoid Surprises
Use anchor bolt templates to lock each bolt in place as a unit, preventing the individual positioning errors and concrete vibration shifts that cause most framing day surprises.
Step‑by‑step placement of anchor bolts
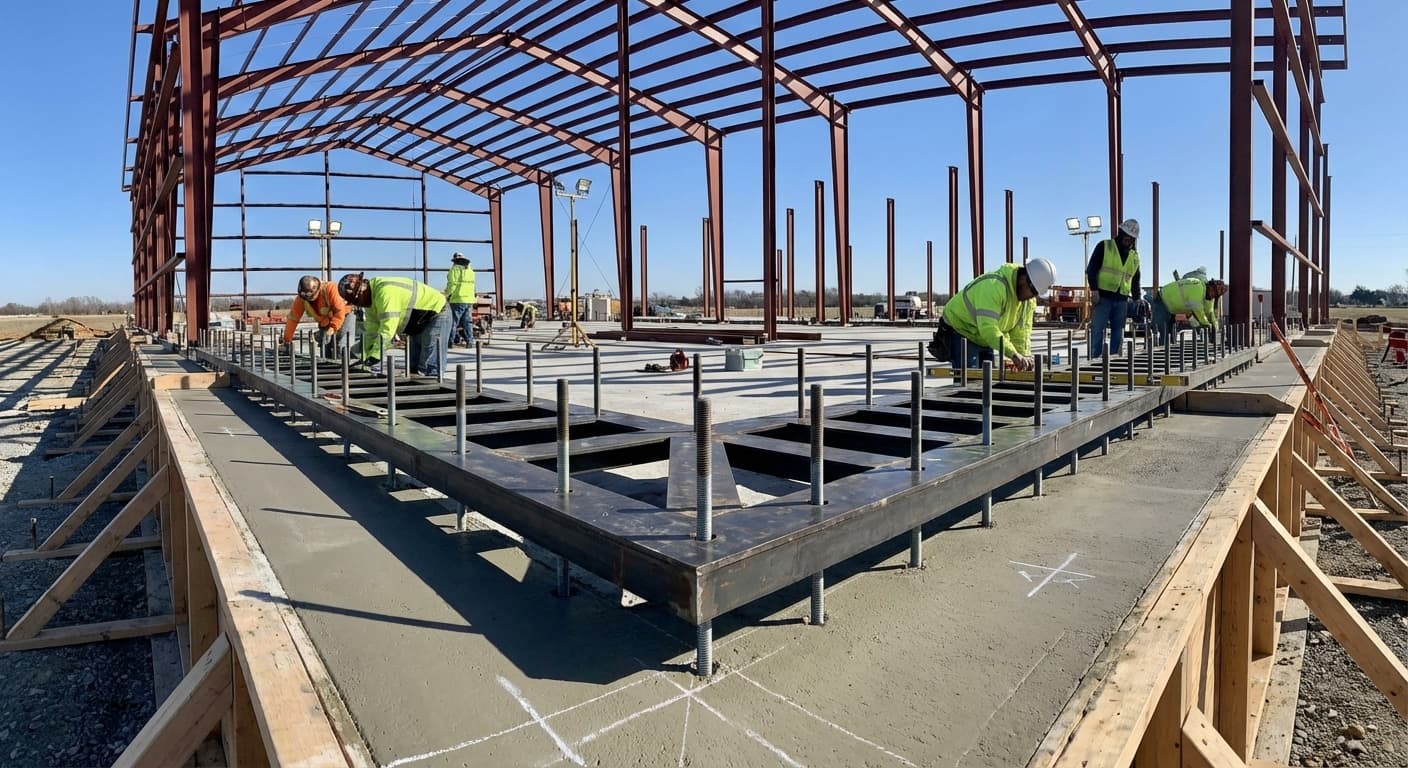
Placing anchor bolts correctly is a sequential process where each step locks in accuracy for the next. Start by setting up your formwork and installing the gravel base, compacting it thoroughly before any concrete work begins. [10] Once the forms are in place, position the anchor bolt template–whether plywood or steel plate–over the formwork and align it against your layout lines.
Slot each bolt through its pre-drilled hole in the template so the group moves as a unit rather than as individual bolts you'd have to position separately. [10] For a 40×80 build, you'll be working with j-bolts or fully threaded rods; j-bolts are worth considering specifically because their curved base resists rotation while concrete cures, preventing bolt drift between the pour and full set. [2] Before the pour, run through the universal placement rules that govern every column location: all structural columns require at least four anchor bolts, every bolt must sit within 1/16" of its engineered position, adjacent bolts can't vary more than 1/4" from each other in diameter, bolt heights must stay within 1/2" of each other, and every bolt must be perpendicular to the foundation at exactly 90 degrees. [2] Deviate on any of these and columns won't seat on framing day. Once the template is secured and pre-pour checks are complete, pour concrete to the specified thickness–typically four to six inches–and allow a minimum of seven days of curing before applying any construction loads. [10] Immediately after the pour and before the concrete stiffens, verify that no bolt has displaced under vibration from consolidation; this is the last moment any correction is inexpensive. [2]
Common framing pitfalls and how templates prevent them
Most framing day surprises trace back to one of three failure points during the foundation stage: surveying errors that misplace the bolt group from the start, concrete vibration that shifts bolts during consolidation, and template movement caused by insufficient bracing. [5] Surveying errors happen when gridlines aren't transferred accurately from drawings to the field–even a few millimeters of deviation at layout can push bolt placement outside the tolerance window by the time concrete sets. [5] Vibration during consolidation is subtler: without a rigid steel template holding bolts in place, the mechanical energy from a vibrator can tilt or rotate individual bolts, breaking the perpendicularity requirement and creating misalignment that only shows up when columns won't seat. [5] Plywood templates resist this less effectively than steel, because they flex under vibration rather than holding position.
Once any of these errors harden into the slab, the correction options narrow fast.
Bolts off by 1/8" to 1/2" can often be addressed by reaming a slot in the base plate–a structural code-permitted fix, though one that requires manufacturer review and typically a larger washer. [11] Bolts more than twice their diameter out of position may allow for drilling a new hole in the base plate, provided the new hole edge stays at least one bolt diameter from the plate edge and nuts still clear column flanges during tightening. [11] Bolts that miss the plate entirely require cutting them flush, drilling new locations with a hammer drill, and epoxy-setting threaded rod anchors–wedge anchors are never appropriate for load-bearing columns. [11] A rigid steel template, properly braced and checked at three points before and after the pour, makes all of these fixes unnecessary by preventing bolt drift before the concrete locks it in. [5]
Quality‑control checkpoints during erection
Once columns are seated and temporary bracing is in place, quality control shifts from bolt placement to alignment and connection integrity–three overlapping domains that run concurrently: physical alignment, connection verification, and documentation. [12] On a 40×80 frame, the inspection sequence covers anchor bolt positions against the as-built foundation layout, erection sequencing against the engineer's plan, temporary bracing confirmation before any connections are finalized, and bolted and welded connections checked against strength requirements. [13] Bolt torque is a specific checkpoint worth calling out: under-torqued bolts allow slip at connections, reducing the load path the structure was designed around, while over-torqued bolts can fracture or strip threads–both create failure points that visual inspection alone won't catch. [12] Running this against a structured checklist–covering location, embedment, projection, and template compliance across organized pass/fail items–makes the process systematic and produces a documented record that satisfies ACI 318 and AISC requirements rather than relying on memory or verbal confirmation. [14] Capturing contractor, client, and subcontractor sign-offs at each stage matters for a practical reason: alignment errors discovered without documentation become disputes; errors with photographic evidence and signatures become correctable items with clear accountability. [13]
Post‑Erection Review and Ongoing Support
Verify bolt grade against mill certificates, check three critical tolerances with a per-pedestal checklist, and document what actually happened versus what you planned.
Verifying bolt placement against engineering specs
Your post-erection check starts with the simplest question: did you get the right bolts? A perfectly placed bolt of the wrong grade creates problems just as surely as one that's out of position. Pull those mill certificates and confirm you have ASTM A307 or A193 B7–the two grades typically specified for column bases–and that they match what your bolt plan called for, not what showed up on the truck. [14] Once you've confirmed materials, run through the three tolerances that separate a proper connection from one that just looks right: bolt spacing within +/-3 mm of plan, projection height within +/-3 mm of spec, and vertical alignment within +/-2 degrees of plumb. [15] These are tighter than eyeball measurements, which is why a per-pedestal checklist pays off–you get a documented record of what passed inspection, not a verbal "looks good to me." [16]
After your columns are seated and base plates torqued, grouting fills the gap between plate and slab. Mix it right, apply it without voids, and let it cure completely before loading the frame. Voids don't just look bad–they concentrate stress at the plate edges instead of spreading it across the full base. [14] A final check of projection height after grouting confirms your nuts still have full thread engagement above the grout line. That's the difference between a connection that performs as designed and one that becomes a maintenance headache later.
Documenting lessons learned for future projects
The real value from your first steel building isn't the structure–it's knowing exactly what surprised you and when. Your site-specific erection plan (required by OSHA anyway) becomes a goldmine when you mark it up with what actually happened versus what you planned. [18]
The issues worth documenting are predictable: foundation problems (a half-inch out of level turns every column into an alignment puzzle), anchor bolt placement that drifted from plan, and torque specs that seemed fine until panels went up and water found its way in. [17]
Budget surprises get their own notes. First-timers typically see the kit price and think that's the total–then site work, permits, and unexpected fixes add 30% or more. Smart builders start with 10-15% contingency built in. Document where that buffer actually went, and you'll know exactly which line items to pad next time. [17]
Write it all down while it's fresh, organized by construction phase. That's how your second building goes up faster, cheaper, and with fewer phone calls to the manufacturer at 7 AM.
Leveraging National Steel Buildings' single‑source service for the next build
Every friction point that slows a build–a missing component, an unclear configuration, a question about what shipped versus what was ordered–resolves faster when one company owns the answer.
With a single-source provider, the entire building envelope ships from one manufacturer, arrives with components bundled and labeled for identification, and comes backed by one contact for inventory discrepancies, field questions, and post-construction support. [19] That single point of accountability is what makes the packing list–received shortly before delivery–actionable: if something is missing or damaged, there's no ambiguity about who to call. [19] The value compounds on future builds.
Steel buildings are modular by design, meaning additional length can be added at either endwall without disturbing the existing foundation, and the supplier that engineered the original kit already holds the load data and configuration history to spec those additions correctly. [20] Returning to the same source for a second structure eliminates the ramp-up cost of re-explaining site conditions, column reactions, and framing preferences to a new vendor–the lessons documented from the first build translate directly into a faster, tighter scope on the next one. [19]
- Steel templates keep bolts within 1/16" tolerance; plywood flexes under vibration and drifts.
- Anchor bolts must hit 1/16" position, 1/4" diameter, 1/2" height or columns won't seat.
- Three-check system–before fix, after secure, post-pour–locks bolt pattern before concrete sets.
- Wrong bolt projection stalls framing: 5/8" bolts need 2", 3/4" need 2½" above slab.
- Single-source supplier ships bundled, labeled kit and owns all post-delivery support issues.
- https://www.metalconstructionnews.com/articles/the-facts-about-foundation-anchor-bolts/
- https://www.rhinobldg.com/blog/how-to-anchor-a-metal-building
- https://www.fortifybuildingsolutions.com/resources/blog/how-to-read-steel-building-anchor-bolt-plans/
- https://www.rhinobldg.com/blog/anchor-bolts-for-pre-engineered-steel-buildings
- https://xtdsteel.com/steel-structure-building/steel-building-anchor-bolt-tolerance/
- https://www.thefabricator.com/thefabricator/article/shopmanagement/best-communication-practices-in-structural-steel-fabrication
- https://metalprobuildings.com/preparing-the-site-what-to-do-before-your-steel-building-erection-begins/
- https://norsteelbuildings.com/steel-building-design-construction/steel-building-step-by-step-assembly-guide/
- https://www.worldwidesteelbuildings.com/blog/pre-construction-checklist-for-metal-buildings/
- https://www.arcosteel.com/a-step-by-step-guide-to-installing-a-bolt-up-steel-building/
- https://greatwesternbuildings.com/anchor-bolt-troubleshooting-pre-engineered-metal-building-install/
- https://quollnet.com/chk/construction/steel-erection-alignment-inspection-checklist
- https://safetyculture.com/library/construction/steel-erection-quality-control-inspection
- https://www.popprobe.com/checklist-library/construction/concrete-masonry/construction-anchor-bolt-inspection
- https://www.linkedin.com/posts/amjad-ali-47998527b_anchor-bolt-inspection-checklist-optimized-activity-7348275477897199617-5bCr
- https://quollnet.com/chk/construction/anchor-bolt-placement-grouting-inspection
- https://iconsteelbuildings.com/how-to-erect-a-metal-building/
- http://www.osha.gov/enforcement/directives/cpl-02-01-034
- https://norsteelbuildings.com/us/advantages-of-steel-series/advantages-single-source-responsibility/
- https://www.summitsteelbuildings.com/metal-buildings-retain-value