
A DIY carport kit gives you garage-grade protection for vehicles and gear at a fraction of the cost and time, and this beginner's guide walks you through every step–from picking the right size (12' for one car, 18-24' for two, 9-12' height for RVs) and navigating permits (budget $75-$300, expect days-to-weeks approval) to matching foundations to soil type and anchoring for 130 mph winds. You'll learn to balance budget (kits $1,500-$10,000; DIY saves labor but triples install time), choose optimal orientation for snow, rain, or sun, and finish with pro-grade weather-sealing and a low-maintenance schedule that doubles lifespan. With pre-cut steel, stamped plans, and same-day assembly possible, the article shows how smart planning, proper site prep, and routine rinses/fastener checks turn a weekend project into a versatile shelter that boosts home value 3-5%, protects vehicles from UV, hail, and debris, and pays for itself many times over.
Why Choose a DIY Carport Kit and How to Select the Right One
Metal carport kits assemble in a single day with heavy-gauge galvanized steel that withstands 130 MPH winds and 33 PSF snow loads.
Cost‑Effective Protection and Property Value Boost with a diy carport kit
You get immediate protection for your vehicles without the massive price tag of a garage. A DIY carport kit costs a fraction of traditional construction–and you'll have it up in days, not weeks. Your vehicles stay protected from hail, snow, UV damage, and falling debris, preserving their value and avoiding costly repairs [3].
Beyond vehicle protection, you gain flexible space that works harder than any garage. Need covered storage? Done. Outdoor workspace? Perfect. Entertainment area for weekend gatherings? Your carport handles it all [1][3]. Well-built carports boost property value by 3-5%, and most buyers actively seek homes with covered parking over bare driveways [3].
The simplified construction saves you time and headaches. You need fewer permits, face easier building codes, and work with materials designed for fast assembly [1]. Choose quality materials and design details–they make the difference between a basic shelter and a structure that enhances your property for decades [3].
Key Features of Modern Metal Building Kits for DIY Projects
Today's metal carport kits deliver professional results with DIY simplicity. You work with heavy-gauge galvanized steel–typically 2" x 3" or 2" x 4" frames in 14-gauge thickness–that shrugs off weather for decades [4][6]. Advanced connection systems create rock-solid joints that go together fast with basic tools. Most carports assemble in a single day [4].
Weather protection has reached new levels. Premium kits handle up to 130 MPH winds and 33 PSF snow loads when properly installed [4]. You get pre-cut components, complete hardware packages, and stamped engineering plans that satisfy building departments [5]. For high-quality
Matching Your Needs: Size, Style, and Custom Options for a diy carport kit
Start with your current vehicles and think ahead. A single car or truck needs at least 12' width for comfortable door clearance [7]. Two vehicles? Go 18-24' wide–18' works for compact cars, but 24' gives breathing room for full-size trucks [7]. Standard lengths start at 21' and increase in 5' increments. Choose 26' or 31' when you want extra storage at one end [7].
Height matters more than you might think. RVs and campers demand 9-12' clearance for roof-mounted gear like AC units and antennas [7]. Add 4-8' to RV length for maneuvering room, and go at least 18' wide if you have slide-outs [7]. Commercial equipment? Plan 3-5' extra height for trucks with bed equipment, 10-12' for box trucks [7]. Remember: side height determines your maximum door height, not the peak measurement [7].
Don't squeeze into minimal dimensions. That slightly larger carport costs less now than rebuilding when you upgrade vehicles [8]. Mark out dimensions with contractor's tape to see the actual footprint, or use 3D design tools to test different configurations [7]. Plan for tomorrow's needs, not just today's parking.
Planning Your Project: Regulations, Budget, and Design
Getting a building permit costs $75-$300 and protects you from insurance denials, fines, and forced removal orders down the road.
Navigating Local Building Codes and Permit Requirements
You'll need a building permit in most areas. It's not optional–it protects you from fines, insurance headaches, and forced removal orders later [9][11]. Your local building department needs to know: carport size, materials, and whether it's attached or freestanding [9].
Here's your permit roadmap:
- Call your building department first
- Prepare a simple site plan showing setbacks from property lines
- Submit your application with stamped engineering plans
- Pay permit fees (typically $75-$300)
- Wait for approval–days for simple projects, weeks for complex ones [9][11]
Skip the permit? Bad idea. Insurance claims get denied. Home sales hit snags. You might tear down what you just built [11].
Smart move: Get
Accurate Cost Estimation, Financing Options, and ROI
Your budget breakdown starts simple. Metal carport kits run $10-$20 per square foot–figure $1,500-$10,000 total [12]. Wood costs more at $5,000-$15,000. As covered earlier, you're saving big compared to garages.
Add these line items:
- Permits: $75-$300
- Site prep: varies by condition
- Labor: 20-40% if hiring pros [12]
DIY saves money but burns time–you'll spend 3-5x longer than pros on assembly [13]. Value your time honestly. That "free" weekend labor might cost more than hiring experts.
Financing? Most suppliers offer monthly payment plans. No huge upfront hit to your cash flow [14].
Your ROI hits multiple ways:
- Vehicle protection from weather damage
- Installation in days, not weeks
- Multi-use space when cars are gone
- 3-5% home value increase (as noted in Section 1) [14]
Bottom line: You're investing $2,000-$10,000 for protection worth far more. Compare that to garage costs and the math gets even better [14].
Optimizing Layout: Carport Size, Placement, and Orientation
Location drives everything. Pick wrong, pay forever. Pick right, enjoy decades of convenience.
Your placement checklist:
- Level ground with natural drainage (detailed site prep covered in next section)
- Easy home access but proper setback from property lines
- Close to power if you want future lighting
- Smart orientation for your climate [15][16]
Climate dictates orientation:
- Snow country? Length perpendicular to prevailing winds
- Rain zone? Built-in roof slope for runoff
- Sun belt? East-west to minimize afternoon heat [15][16][17]
Size smart, not minimum. We covered detailed dimensions in Section 1, but remember these basics:
- Single vehicle: 12' width minimum
- Two vehicles: 18-24' width
- Add 3-4' clearance for comfort
- RVs need special attention to height and length [15]
Pro tip: Stake out your planned dimensions with string. Walk around it. Open imaginary car doors. Picture loading groceries in the rain. Better to adjust stakes now than steel later [17].
Your layout directly impacts daily use. Take time here–it's the difference between a carport you tolerate and one you love.
Preparing the Site and Choosing a Foundation
A simple jar test reveals your soil composition in five minutes, preventing costly foundation problems before you start building.
Assessing Soil, Drainage, and Climate Considerations
Your soil type drives foundation decisions–and foundation costs. Clay expands and contracts with moisture, potentially shifting your structure. Sandy soil drains well but needs extra compaction. Rocky ground provides stability but challenges installation [18].
Want to know what you're working with? Run a simple jar test: fill a jar one-third with your soil, add water until two-thirds full, shake hard, and watch it settle. Sand drops first, silt next, clay on top [18]. This 5-minute test saves you from foundation problems down the road.
Smart drainage protects your investment. Create a slight slope away from your carport–just 10mm drop per meter keeps water moving without you noticing the grade [19]. Got drainage issues? Install agricultural pipes wrapped in gravel and connect to existing stormwater systems where required [19].
Time your project right. Skip site prep during wet seasons–you can't properly compact wet soil, and fixing that mistake later costs more than waiting for dry weather [19]. In high-wind zones, match anchors to your soil: rebar anchors for firm ground, auger anchors for loose or sandy conditions [18]. Planning a
Foundation Options: Concrete Pad, Compact Gravel, and Ground Anchors
Concrete pads deliver maximum stability and last longest–perfect for permanent installations and heavier structures. You'll need a hammer drill, concrete anchors, and basic safety gear. Drill through your base rails into the concrete, then secure with expanding bolts [20]. Yes, concrete costs more upfront, but you save on long-term maintenance.
Gravel foundations cut costs while providing good drainage–a smart middle-ground option. Use mobile home anchors here: hook them through base rail holes and twist into the gravel with a pry bar [20]. Pro tip: wear safety glasses (flying gravel hurts) and work gloves (that pry bar causes blisters) [20].
Dirt foundations work fine with proper compaction and cost the least. Same anchor method as gravel–mobile home anchors twisted through base rails into soil [20]. Whatever foundation you choose, bigger structures need extra anchor points at corners for wind resistance [20].
DIY anchoring saves money, but in high-wind areas? Professional installation pays for itself by preventing that one storm from turning your carport into your neighbor's problem [20].
Ensuring Level Ground and Proper Anchor Placement for Stability
Level ground keeps your carport standing straight–and your doors closing properly. Check your site with a string line or laser level to spot high and low areas [18]. You want that subtle drainage slope mentioned earlier, but the overall surface stays even.
Space your anchors 4-6 feet apart around the perimeter for even load distribution. Drive them at least 2-3 feet deep–deeper means stronger hold [18]. Concrete? Hammer drill through base rails and secure with expanding bolts [18]. Gravel or dirt? Mobile home anchors twisted through base rails do the job [18].
Big carports need extra muscle. Add multiple anchors at each corner where wind stress concentrates [18]. After everything's secured, install gutters and downspouts to channel water away from your foundation–erosion is a slow but persistent enemy [18].
As covered in the maintenance section later, check your anchors yearly and after major storms. Small adjustments now prevent big problems later [18].
Assembly, Safety, and Final Finishing
Proper assembly requires specific tools and experience, which is why many homeowners choose professional installation to avoid stretching a weekend project into days.
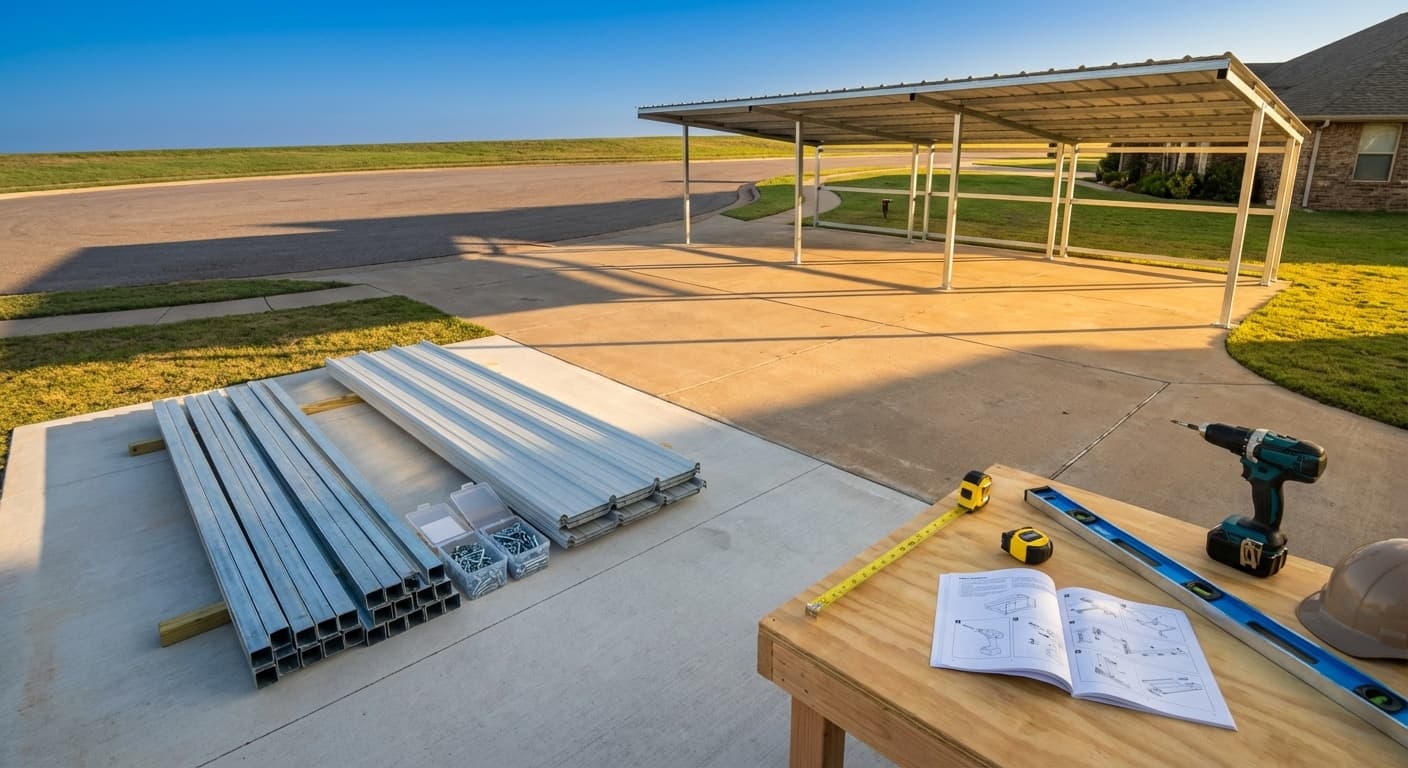
Essential Tools, Safety Gear, and Material Checklist
Your carport goes up fast when you start prepared. A quality screw gun with torque control, basic measuring tools, and the right safety gear get the job done efficiently [23]. Work gloves protect against sharp edges. Safety glasses keep metal debris out of your eyes [23]. That's non-negotiable.
Before you start, verify your kit's complete. Count every component against your packing list–base rails, posts, peaks, rafters sized for your width, and all fasteners [23]. Missing one piece stops everything. Smart installers organize parts by assembly stage in labeled containers. No hunting, no delays [22].
For those weighing DIY versus professional installation, consider this: proper assembly requires specific tools and experience. What takes professionals hours can stretch into days for first-timers. That's why many choose
Quality Inspection, Weather Sealing, and Ongoing Maintenance
Quality matters. Walk your completed structure checking every seam, edge, and fastener. Bolts need proper torque–tight enough to hold, not so tight they strip [24]. Anchors must stay put. The frame should stand level without sagging [26]. Touch up any scratches immediately with zinc-rich paint to prevent rust from starting [24].
Weather sealing protects your investment. Apply butyl sealant tape to all seams–it stays flexible and seals tight [24]. Use EPDM washers on every fastener and tighten to spec. Over-tightening cracks washers and creates leaks [24]. Brush away metal shavings during installation. They rust fast and stain everything [24].
Simple maintenance extends life by decades:
- Weekly: Rinse with a garden hose. Salt and pollution accelerate corrosion, especially near coasts [24][25]
- Monthly: Check fasteners and anchors. Fix small problems before they grow [24]
- Seasonally: Clean with mild soap and soft brush on cool days. Skip the pressure washer–it forces water into seams [24][25]
- After storms: Clear snow evenly with a non-metal rake. Leave a thin layer rather than scraping bare [24]
- Twice yearly: Clean gutters to prevent trapped moisture [24]
This routine takes minutes but saves thousands. Steel structures fail gradually, not suddenly. Regular care catches issues early when they're cheap to fix [24].
- Get a building permit first–skipping it risks fines, denied insurance, and forced removal.
- Anchor every 4-6 ft, 2-3 ft deep, with extra corner anchors for wind resistance.
- Size carports 12' for one car, 18-24' for two; add 3-4' clearance for comfort.
- Concrete pads give maximum stability; gravel offers cheaper drainage; dirt needs compaction.
- Apply butyl sealant tape to seams and use EPDM washers on every fastener to stop leaks.
- Rinse weekly, check fasteners monthly, clean gutters twice yearly to prevent rust.
- DIY saves cash but takes 3-5x longer–value your time before choosing.
- https://www.fixr.com/comparisons/garage-vs-carport
- https://www.angi.com/articles/carport-vs-garage.htm
- https://www.backyardstorage.com/articles/does-adding-a-carport-increase-home-values
- https://www.versatube.com/building-kits/carports-shelters/classic-carport-22-w-x-24-5-l-x-12-h-55634?srsltid=AfmBOoqYuke9GK2etRKRxaiFq2wDsNw4YS9PFG6hBBjXZQ1_-aJyM6nZ
- https://metalcarport.com/home/
- https://www.absolutesteeltx.com/carport-kits/
- https://www.eaglecarports.com/blog/carport-size-guide-for-rvs-trucks
- https://americansteelinc.com/blog/the-ultimate-carport-size-guide/
- https://alansfactoryoutlet.com/blog/carport-permits/?srsltid=AfmBOoqPE33LJOEiW8oUtKfDa1gajr-gS1x4w-E3cwb-I08SWRuy6kfI
- https://shedsunlimited.net/state-regulations/garage-permits-in-ny/?srsltid=AfmBOoqqC0uhnnF0QprMSBEc8R2dUkMFHdTgjGdOTXnfF1ok2Crhoc2u
- https://www.permitflow.com/blog/new-york-state-building-permit-requirements
- https://alansfactoryoutlet.com/blog/cost-to-build-a-carport/?srsltid=AfmBOoqf4Hb2ImMl2-kDZV15mJZlNWPabVCFP76S8HYj51dML6GVB3vO
- https://keensbuildings.com/diy-vs-professional-carport-installation-cost-comparison/?srsltid=AfmBOooleEJkihzpUaeP5nDk5dTz5P-xZXGL5m6JdblVcgBBzV1hUDRs
- https://www.abettercarport.com/blog/custom-carports-benefits-costs-options
- https://www.aosom.com/blog-the-complete-diy-carport-guide-build-with-confidence.html?srsltid=AfmBOopzgl1HlQdZaGn0fYGYE_YTLsckmi-ZtW0AGMX5fVQlyxwD7qJ2
- https://americansteelinc.com/blog/how-to-install-a-metal-carport-professional-guide/
- https://awnings-unlimited.com/carport-installation-101-your-go-to-guide-before-you-start/
- https://titansunrooms.com/carport-foundation-tricks/
- https://patioswholesale.com.au/how-to-prepare-your-site-for-a-diy-patio-pergola-or-carport/?srsltid=AfmBOoo02lRySosoYa5PkojCGnVHSOWrT64avPBaB71SnGP0P-UjvvkY
- https://acraftedpassion.com/how-to-anchor-a-carport-to-any-foundation-type/
- https://carportsolution.com/news/diy-carport-installation-101-tips-for-a-successful-build/
- https://torosteelbuildings.com/blog/steel-carport-kits-diy-installation-steps/
- https://lyonmetalroofing.com/tutorials/diy-horizontal-carport-kit/
- https://metalprobuildings.com/metal-carport-maintenance-tips/
- https://www.pinuphouses.com/essential-maintenance-tips-for-metal-carports/?srsltid=AfmBOopy-Ykn1337PtWSkpSEHFPtl25iHILCgHJOCNO5IbQo7nP6E0Q_
- https://www.metalbuildingoutfitters.com/what-are-the-top-tips-for-metal-carport-installation/