
Building a farm equipment storage shed that actually saves time starts with measuring every machine–then adding generous clearance, because guessing dimensions turns daily tasks into frustrating three-point turns and season-long delays. The article shows how to size door heights, aisle widths and overall footprints for today's 20-foot combines, 48-foot planter wings and 17-foot tillage tools, while projecting three-to-five-year equipment growth and budgeting an extra 20-30 % space buffer so upgrades don't trigger costly rebuilds. Readers learn layout tricks–racetrack loops, sidewall entries, column-free clear-span steel–that let tractors, headers and semis flow in and out without backing up, plus how to use color-coded floor lines and fleet-tracking data to spot and fix bottlenecks before harvest crunch time. It details real numbers: 40-60 ft outside approaches, 12-16 ft interior aisles, 24×15 ft minimum doors, 60×80 ft baseline footprints, and turnkey steel costs of $24-$43 per square foot, while stressing that financing, insulation upgrades and single-source suppliers protect both cash flow and future expansion. By combining precise measurements with smart design and quality pre-engineered steel, farmers can eliminate daily maneuvering headaches, cut maintenance and energy bills, and erect a building that adapts to bigger equipment instead of forcing expensive replacements.
Understanding Farm Equipment Storage Building Dimensions for Efficient Maneuvering
Measure your tallest equipment in operating position, add 3-4 feet clearance, then add 2 more feet for the overhead door header to avoid costly height mistakes.
Why farm equipment storage building dimensions matter for workflow efficiency
Getting dimensions wrong costs you time every single day. When your combine needs three tries to clear a tight corner, or you're backing out equipment because the aisle's too narrow, those wasted minutes add up to hours by season's end. The math is simple: size your building around your actual equipment–including real maneuvering clearances–and you eliminate unnecessary movement before it starts.The biggest regret you'll hear from farmers after construction? "We didn't build it big enough"–and they're usually talking about door height or interior space, not footprint [3].
Why? Because they estimated dimensions instead of measuring actual equipment. Today's machinery demands serious space–storage buildings now run 75 to 100 feet wide [3], with vertical clearances of 13 to 15 feet for combines with cabs and exhaust stacks [1]. Miss those specs by even a few feet, and every entry becomes a threading-the-needle exercise instead of a drive-through.Your clearance needs start outside the building.
You need at least 40 feet of open space in front of doors for standard equipment to line up clean–bump that to 60 feet for semi-trailers and long implements [1]. Inside follows the same principle: measure your largest piece, add a working buffer, and that's your true floor-space requirement [2]. Skip this step, and you'll create bottlenecks that slow operations no matter how organized everything else looks.
Key measurements: width, length, height, and clearance zones
Height mistakes cost the most to fix. Your compact tractors and utility vehicles fit under 12-14 foot ceilings, but large tractors with cabs need 16-18 feet. Combines and construction equipment? Plan on 20 feet minimum [4].
Here's your formula: measure your tallest equipment in operating position–bucket raised, cab at full height, stack extended–then add 3-4 feet clearance. If you're installing an overhead door, add another 2 feet to the header height beyond that [4]. For width and length, start with total equipment footprint: measure every piece, add those square footages, then multiply by 1.5 for maneuvering lanes and access aisles [4]. Your main aisles need 12-16 feet clear width for equipment movement without backing up [4].
Building width has its own rules–go at least twice your equipment door width to leave proper wall space for benches and tools without crowding the entry [1]. Once you pass 50 feet wide, move that repair bay entry to the sidewall instead of the endwall–it keeps your work areas sized right [1]. After you've got your baseline, add 20-30% on top. That's not padding–it's protection against equipment upgrades, seasonal storage needs, and the surprises farming throws at you [4].
Integrating door placement and aisle width for optimal movement
Door placement and aisle width work together–nail one but miss the other, and you've still got bottlenecks. As covered in detail in our design strategies section, buildings over 50 feet wide benefit from sidewall entries, while narrower structures work fine with endwall doors [1]. Keep endwall sliding doors to half your building width max: a 20-foot door in a 40-foot building leaves you 10-foot work areas on each side–enough for benches and tools without cramping movement [1].
Today's minimum door sizing starts at 24×15 feet, with 2 feet of side clearance and 1 foot of head clearance beyond your largest current machine–because equipment only gets bigger [5]. Smart operators add a smaller overhead door for pickups and utility tractors, saving wear on the main door and time on routine passes. Go vertical-track on those smaller doors to keep hardware from eating into work space [5].
Your pre-engineered steel building design should account for prevailing winds when positioning doors–it cuts heat loss and reduces wind damage risk during daily operations [1]. Remember: proper dimension planning from the start means your
Dimension Guidelines Tailored to Specific Farm Machinery
Size your storage around equipment in working configuration–a combine with header mounted needs 20% more floor space than the bare machine.
Farm equipment storage building dimensions for tractors, combines, and harvesters
Tractors, combines, and harvesters aren't interchangeable when it comes to storage — and planning them as one category costs you space and time. As covered earlier, modern equipment needs 13 to 15 feet of clearance, but the real planning challenge is floor space. Your combine's footprint changes dramatically with headers attached: a 6-row unit needs 20% more floor space with a cornhead or grain header mounted. [6] If you're storing equipment ready-to-roll between harvests, size for that configuration — not the bare machine. Width matters more than length for this equipment class. Buildings under 32 feet wide force constant repositioning — you need 40 to 48 feet minimum for practical movement. [6] Watch your tallest equipment: large foldup tillage tools reach 17.5 feet high in transport position, so if they share space with combines, that's your door height target, not the average. [6]
A 16-foot wall height handles most combinations while keeping costs in check — go higher and your structural requirements jump. [7] For full equipment lineups, start with a 60×80-foot footprint before adding the maneuvering space discussed in previous sections. [8]
Sizing for specialty equipment, implements, and future expansion
Implements trick you on space. That 28-foot disk harrow? It needs 384 square feet as a 2-section foldup but 825 square feet in swing-around configuration — same working width, double the storage space. [6] Your 16-row planter tells the same story: folded for transport versus field-ready with extended hitch changes the footprint completely. [6]
Here's what catches most operators: foldup designs save floor space but push door heights higher. A wider wing-pivot angle can reduce both, but you need those exact specs before breaking ground. [6] Document every implement's make, model, and fold configuration — two identical working widths can differ by 50% in storage footprint. Even hitch type matters: a mounted 4-bottom plow takes less space than the same capacity in pull-type. [6]Equipment grows faster than you think. Project 3 to 5 years out, identify what you'll likely upgrade to larger models, then apply the 20-30% buffer mentioned earlier. [4] That's not excess — it's working space for seasonal equipment shuffles, temporary storage of hitched combinations during busy periods, and the reality that your next tractor will be bigger than today's. [6]
Plan expansion from day one. Extending length by removing an endwall costs 20-40% less per square foot than building new — but only if you orient the building right and size electrical and foundations for growth. [4] Keep your shop separate from equipment storage. When
Scaling from 30×40 barns to large‑scale dairy or grain facilities
Small operations start at 30×40 feet — enough for a utility tractor, ATV, and basic implements. Add a row-crop tractor? You're looking at 40×60 to 50×80 feet minimum. Mix in planters and a combine? That pushes you to 60×80 before accounting for the maneuvering space outlined earlier. [7]
Large-scale operations think bigger. Modern grain facilities run 80×165 feet and up, with 18-foot doors standard. [9] Dairy adds complexity — stall layouts, feed alleys, and manure systems each demand fixed widths before you can size the building. [7]
Here's the critical mistake to avoid: undersizing width. You can extend length by removing an endwall, but adding width later? That's often a tear-down. [9] Build 10 feet too narrow today, and you'll replace the whole structure when you upgrade. Build 10 feet wider from the start, and that same building serves you through multiple equipment cycles. [9]
Design Strategies that Minimize Turn Time and Maximize Productivity
Match your aisle configuration to your building shape and equipment's turning radius to eliminate constant repositioning and wasted floor space.
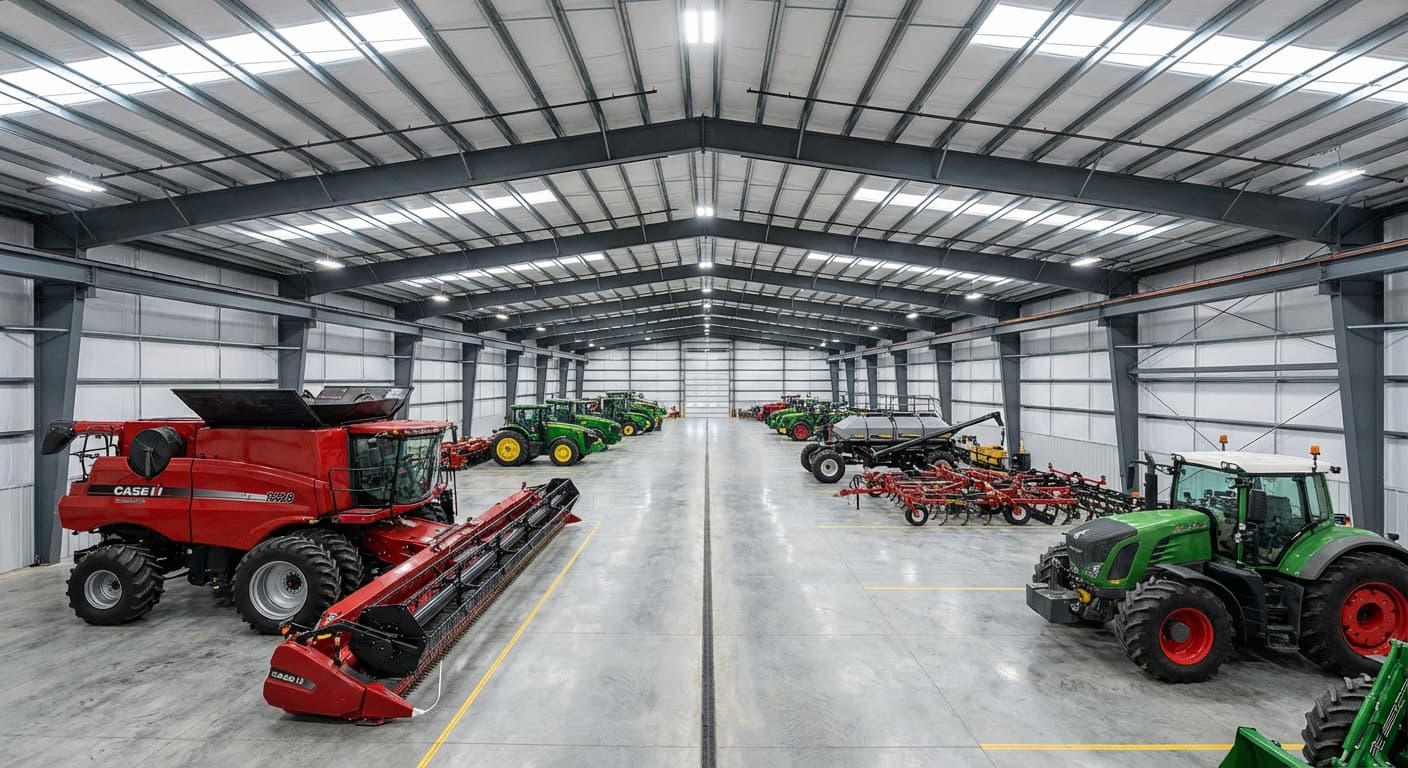
Designing turn circles and pathways within farm equipment storage building dimensions
Your turn circles and pathways determine whether equipment flows smoothly through the building or requires constant repositioning. The key is matching your aisle configuration to your building shape and daily workflow. In medium-size buildings, a racetrack layout — continuous loop around the perimeter with interior parking bays — lets you drive in, loop around, and exit without backing up. [10] Long, narrow buildings work better with a central aisle system where equipment drives in and parks along both sides, though you'll need enough length for a full turnaround at the far end to avoid backing out. [10]
Your practical turn radius equals your largest equipment's turning circle plus any attached implement — measure the combined unit, not just the tractor. As discussed in earlier sections, you'll need those 12-16 foot main aisles for equipment movement, plus 8 to 12 feet of clear work area along repair bays in buildings wider than 32 feet. [1]
Outside the building, follow the clearance requirements outlined earlier: 40 feet minimum for standard equipment, 60 feet for semi-trailers and long implements. Your approach apron should extend 16 feet from the door and run 4 feet wider than the opening — this keeps your front axle from dropping off a grade change during that final turn. [1]
Optimized interior layout: column placement and open‑span options
Your biggest layout decision comes down to this: columns or no columns.
Traditional post-and-beam structures drop support columns right in your working space, creating fixed obstacles that force equipment into tighter turns and leave dead zones where nothing fits properly. [11] Every column shrinks your usable floor space — not just where it stands, but in the wasted area around it where equipment can't park and workflows can't run. [12]
Lighting, floor markings, and technology aids for safe navigation
Once your layout is set, make it work in daily use with visual guides and smart technology. Color-coded floor markings show operators exactly where to go — no reading required, just follow the lines. Strategic marking placement reduces congestion and prevents those costly misjudgments when visibility drops. [13] OSHA requires you to mark permanent aisles, but smart operators go beyond compliance. Your marking system should create pathways operators follow without thinking, especially when maneuvering large equipment through tight spaces. [13]
Shadow boards take the same approach for tools and smaller implements — painted outlines show what goes where. Missing items become obvious at a glance, tool retrieval speeds up, and maintenance areas stay clear instead of accumulating clutter that narrows your carefully planned aisles. [13]
Modern fleet management systems add another layer of efficiency. They track equipment movement patterns and reveal bottlenecks you can't see from the floor. When a specific bay consistently requires extra positioning attempts, the data shows you before the next harvest — letting you adjust the layout while it's still on paper, not after the concrete's poured. [13]
Choosing a Quality Steel Solution with Full‑Service Support
Steel buildings deliver ROI through maintenance savings, energy efficiency, and rising property value, with financing options and tax incentives available to reduce your upfront cost.
Selecting steel structures that meet farm equipment storage building dimensions and performance needs
For farm equipment storage, the clear-span advantages discussed in the design section become even more critical when selecting your actual building system.
As covered earlier, removing interior columns opens your entire floor plan — but the real value shows up in customization flexibility.
You specify exactly what your operation needs: width, length, height, door configurations, insulation, and roof pitch all adjust to match your equipment clearances rather than forcing you to adapt. [16] Pre-engineered
Cost‑effective budgeting: price per square foot, ROI, and financing options
Steel building costs split into three numbers you need to track: kit price, installation, and site prep. Don't let anyone quote you just the kit price and call it complete. Kit-only runs $10-$25 per square foot, with smaller buildings (under 1,000 sq ft) costing more per foot ($15-$30) because engineering and delivery costs don't scale down. [17] Turnkey pricing — building delivered and erected — averages $24-$43 per square foot. Site prep adds another $5-$10 per square foot for grading, drainage, and concrete. [17] Recent market rates show materials at $17-$20 per square foot and erection at $6-$10, though steel prices shift quarterly. [18] Your ROI comes from three directions: maintenance savings (no rot, no termites, no repainting), energy efficiency that cuts heating and cooling bills year after year, and property value that goes up instead of down. [17] Energy upgrades — better insulation, natural light design, efficient ventilation — often qualify for tax incentives that reduce your upfront cost. [18]
You don't need full cash to start. Agricultural loans, construction financing, equipment lines of credit, even manufacturer programs can fund your project. [17] What matters in any financing deal: the rate, the term, whether you can pay early without penalty, and whether your lender knows agricultural construction. Those four factors control your real cost over the loan period. [18]
Single‑source service from design through installation and ongoing maintenance
The coordination burden of a construction project — tracking multiple suppliers, managing delivery schedules, resolving component mismatches — falls entirely on the building owner when responsibility is split across vendors.
Single-source service eliminates that.
When one supplier is accountable for the entire building envelope, from initial design through kit delivery and erection, there's one point of contact for questions during construction, one call if a component arrives damaged or missing, and one relationship to return to when expansion or repairs become necessary years later. [19] Components arrive pre-cut, pre-drilled, and labeled with a complete packing list for inventory verification before installation begins — which means discrepancies surface before they stall a crew, not during assembly. [19] That accountability structure also changes how post-build support works: the same supplier who designed the building to your equipment clearances can extend it when operations grow, because they already know the original specifications, load calculations, and door configurations rather than starting from documentation review. [19]
- Measure tallest equipment in operating position, add 3-4 ft clearance; door headers need 2 ft more.
- Multiply total equipment footprint by 1.5 to set floor area; main aisles must be 12-16 ft wide.
- Build 10 ft wider than current need–width can't be extended later without tearing down.
- Require 40 ft apron in front of doors for standard gear, 60 ft for semi-trailers and long implements.
- Clear-span steel removes interior columns, freeing turning space and future reconfiguration.
- Budget turnkey cost $24-43/sq ft plus $5-10/sq ft site prep; finance via ag loans or credit lines.
- Plan expansion from day one: orient building for endwall removal and size foundations for growth.
- https://www.extension.purdue.edu/extmedia/ae/ae-104.html
- https://ruralbuildermagazine.com/best-practices-for-big-agricultural-sheds/
- https://www.metal-buildings.org/equipment-storage-building-size/
- https://www.extension.purdue.edu/extmedia/ae/ae-115.html
- https://strategosinc.com/RESOURCES/07-Layout-Facilities/Aisle_Design.htm
- https://leanmh.com/from-floor-markings-to-fleet-management-the-new-toolbox-for-warehouse-efficiency-and-safety/