
We walk you through designing a functional 20×40 cattle shelter that prioritizes animal welfare, proper drainage, and ventilation from the foundation up. A well-planned steel frame shelter with concrete flooring, strategic door placement, and managed airflow keeps cattle comfortable across seasons while staying structurally sound for decades.
Planning the Seasonal Shelter
Undersized pens and bunks silently cut growth performance, so design around FASS benchmarks–35 sq ft per finishing head and 6 inches of bunk space–before you build.
Assessing Cattle Needs and Site Selection
Space is where most shelter conversions go wrong before the first panel goes up. Cattle follow a strict social hierarchy — dominant animals eat first, and crowded conditions push lower-ranked animals away from feed bunks, reducing their intake and cutting growth performance across the entire group.[1] The FASS Guidelines for Animal Care and Use set the benchmarks you need to design around: finishing cattle in an enclosed bedded-pack setup need 35 sq ft per head, grouped calves need 30 sq ft per head, and heifers between 6 and 24 months require 35-40 sq ft each.[2] A 20×40 livestock shelter steel frame gives you 800 sq ft of usable floor space — enough for roughly 20-22 finishing cattle or up to 26 grouped calves before headcount begins trading against animal welfare.[1] Bunk space is typically the first hard constraint you'll hit: finishing cattle on free-choice grain need a minimum of 6 inches of bunk per head, so map that against your 40-foot wall before locking in the interior layout.[1] If the numbers feel tight, the smarter move is to reduce animal numbers or plan a future bay addition rather than shortchange pen or bunk space — underfed, lower-ranked cattle won't grow to potential, which quietly erodes your return every single season.[1]
Once you know your animal count, site selection determines whether your shelter works year-round or creates drainage headaches you'll spend years fixing. Place the building on well-drained soil with designed surface-water runoff, away from streams or other water bodies, and served by an all-weather driveway — your county Natural Resources and Conservation Service (NRCS) office publishes local siting guidelines that are worth a call before you break ground.[2] For open-sided or partially enclosed designs, orient the open face south to capture winter solar radiation and block prevailing winds, cutting cold stress on the herd without adding any heating cost.[2] Cattle need reliable indoor shelter to stay safe and comfortable through seasonal weather shifts, and a well-sited structure does that passively — the building's position alone can mean the difference between a dry, warm shelter and a wind-scoured pen that stresses animals every cold night.[3] If the ground at your target footprint holds water after rain, resolve drainage before the steel frame arrives — retrofitting drainage under a poured slab is one of the most avoidable cost overruns in agricultural steel buildings projects of any size.
Designing with 20×40 livestock shelter steel for optimal space
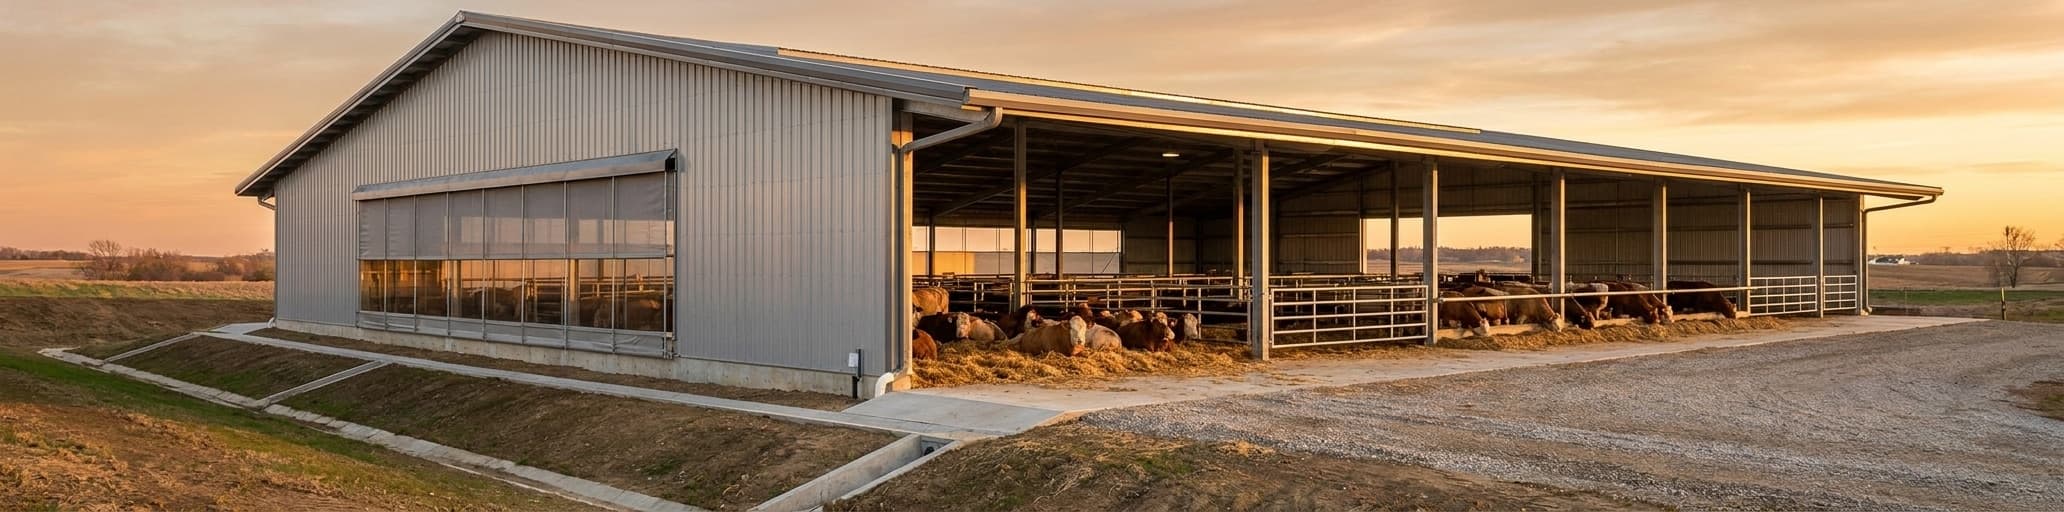
Once your headcount and site are locked in, the roof configuration is where interior design decisions begin — and a monoslope setup resolves several layout problems at once. The sloped roof directs water away from the open face of the building, keeping feed dry and preventing cattle from being drenched by runoff.[4] Position the open pen side facing south so winter sunlight reaches the herd at floor level, while the enclosed north wall uses adjustable curtain panels that you can open or close to manage cross-ventilation as seasons change.[4] The open south face is also where feed access and pen entries belong, keeping tractor and equipment movement on the north side from interfering with feeding activity.[4] This single structural choice — which direction the slope runs and which wall stays open — determines traffic flow, solar gain, and drainage for the life of the building.
Below the roofline, material selection at the wall base and floor level determines how long the building holds up under daily livestock use. Concrete on the lower four feet of interior walls resists the impact and moisture that cattle generate at contact height; full concrete flooring across the entire 800 sq ft gives you a surface that cleans down without absorbing manure acids or harboring pathogens between groups.[4] Steel gates dividing pens are far more durable than wood in a livestock environment and let you reconfigure pen layouts between calving, finishing, or heifer groups without touching the structural frame — a real advantage when your steel frame farm building system needs to flex across multiple production seasons.[4] To prevent condensation from dripping off the steel roof deck onto animals and bedding — a persistent problem where respiration and manure gases keep interior humidity elevated — apply a vapor-control liner panel to the inside of the roof surface during initial construction rather than retrofitting it later.[4]
Ventilation is where all of these design choices connect. Ammonia and noxious gases accumulate quickly in any bedded-pack environment, and adequate airflow through a ridge opening, an eave gap, or supplemental fans keeps concentrations low enough to protect herd respiratory health.[5] For a 20×40 livestock shelter steel build in most climates, natural ventilation through the open south face combined with operable curtain openings on the north wall handles most seasonal conditions without mechanical systems, cutting both upfront construction cost and ongoing operating expense.[4]
Budgeting and Cost Estimation for a 20×40 Steel Frame
The base kit for a 20×40 steel building — frame, roof panels, and wall panels — runs $7,000-$12,000, and that number climbs as soon as you add features a working cattle shelter actually demands.[6] Galvanized steel, which resists the corrosive mix of manure gases and persistent humidity inside any bedded-pack pen, costs more upfront than standard steel but holds up far longer in agricultural use.[6] Roll-up doors, operable curtain panels, insulated wall sections, and gutters each carry their own line item, so build your complete feature list before requesting any quotes — surprises added after the initial quote are where budgets break.[6] Local building codes shape structural specs directly: counties with heavy snow loads or high wind exposure require heavier primary framing, and compliance can add material cost before a single bolt is turned.[6] Regional steel prices and shipping distance from the manufacturer both move the final number, making it worth sourcing through a supplier with national buying power to reduce freight exposure.[6] Metal barns as a category range from $10,000-$50,000 installed, which puts a clean, no-frills 20×40 livestock shelter at the lean end of that spectrum when you keep the design to natural ventilation and a straightforward floor plan.[7] For context on how those numbers compare to wood construction across a longer horizon, the steel barn cost vs wood barn 20-year analysis shows where the math consistently favors steel.
Collecting three or more quotes from manufacturers who supply certified agricultural steel packages gives you both price leverage and code compliance confidence — certified materials reduce the risk of structural redesigns after permit review, which is one of the most avoidable cost overruns in any steel shelter project.[6]
Preparing the Foundation and Layout
Proper soil preparation and grading with a 5% slope away from your building prevents foundation damage and keeps manufacturer warranties intact for decades.
Site Clearing, Grading, and Drainage Solutions
Before the first anchor bolt goes in, the soil itself determines whether your 20×40 livestock shelter steel pad stays level for two decades or starts shifting after a single wet winter. Strip all sod and vegetation from the entire building footprint, pull the topsoil, and remove any clay or silty soil from within the footprint area — both materials compress unevenly under load and trap moisture against your foundation.[8] Replace what you remove with granulated, debris-free fill distributed in layers no deeper than six inches, compacting each layer to a minimum 90% Modified Proctor Density before adding the next.[8] Skipping compaction in lifts is one of the most common causes of slabs that develop waves, uneven slopes, and sticking door frames within a single season.[9] Before any digging starts, call 811 — it's a free utility-marking service, and property owners who strike a buried gas or electric line without marking are financially liable for the damage.[8]
With the pad compacted, finished floor elevation and slope are the two grading decisions that control whether water obeys you or fights you. Keep the finished floor level higher than the surrounding grade so surface water drains away from the structure; on sites where fill was imported to reach that elevation, hire a surveyor to confirm the finished floor height before pouring.[8] Grade the area beyond the building perimeter at a minimum 5% slope — a 6-inch drop over 10 feet — in all directions away from the structure.[8] That number is supported by manufacturer guidelines and common code expectations alike; failure to reach it is one of the most cited causes of drainage failures around steel buildings, and poor grading that channels water toward the foundation can void manufacturer warranties outright.[8] Many jurisdictions also require a separate grading permit before any soil can be moved, so confirm local requirements with your building department before breaking ground.[8]
Surface runoff and subsurface water are separate problems, and solving one without the other leaves your pad vulnerable. Surface water is managed by grading slope, gutters, and downspouts extended at least 6 to 10 feet from the building before discharge — gutters are not optional on a working livestock shelter, where roof runoff can saturate post pockets and undermine the pad edge with every storm.[9] Subsurface water, the less visible threat, is addressed with a coarse gravel bed beneath the slab that breaks capillary action and prevents ground moisture from wicking upward into the concrete.[9] Where groundwater pressure is higher, a French drain — perforated pipe in a gravel-filled trench — laid around the building perimeter intercepts subsurface flow before it reaches the foundation.[9] Clay is the wrong fill material under any livestock slab: it expands when saturated, contracts when dry, and transfers that movement directly into concrete.[9] Use gravel or compacted sand beneath the slab and never use topsoil as sub-slab fill — it holds moisture and decomposes over time, creating voids that crack concrete from below.[9] For a fuller look at how slab thickness decisions interact with site conditions on a comparable footprint, the 30×40 concrete slab cost breakdown covers the tradeoffs in useful detail.
Concrete Slab Options and Fast-Track Foundations
Full concrete flooring across the entire building footprint, combined with concrete on the lower four feet of interior walls, is the correct slab specification for a working cattle shelter — not a premium upgrade.[4] Manure acids, persistent moisture, and the daily impact loads cattle generate at contact height degrade unprotected surfaces faster than any other livestock environment, and a full concrete floor eliminates the microbial reservoir that forms in packed-gravel or dirt floors between groups.[4] In a monoslope layout, the sloped roof prevents water from running onto the open floor face, so the slab stays cleaner at the feed end and any wash-down water moves toward the back wall rather than collecting at pen entries — a passive drainage advantage the slab design should reinforce, not fight.[4] For anyone working through slab thickness decisions on a comparable footprint, the concrete thickness guide for steel buildings covers how intended use drives that number before you ever call a concrete contractor.
The fast-track advantage of prefab steel is realized at the foundation stage, not during frame erection. Steel livestock buildings are engineered to go up quickly once the slab is cured and the anchor bolt pattern is set — the primary and secondary framing arrives pre-engineered to the exact footprint, with no field cutting or structural improvisation required.[4] Framed openings for roll-up doors, curtain panels, and windows are positioned during kit design, before a single component ships.[10] Because prefab barn packages lock in all customization options — doors, windows, roof style, and utility penetrations — at the design stage rather than on-site, the slab penetration and anchor bolt layout is finalized before you order concrete, not discovered on pour day.[11] That sequencing discipline is what keeps a seasonal shelter on a fixed occupancy schedule; a delayed pour compresses every downstream task when spring calving or fall finishing is the target date.
Aligning the Steel Frame with Utilities and Access Points
Utility rough-in has a hard deadline: before the slab is poured. Running conduit, water lines, and electrical feeds after the concrete is cured means cutting into it — added cost and added time that a single pre-pour walkthrough with your electrician and plumber eliminates entirely.[13] In a 20×40 livestock shelter, the utility list is short but non-negotiable: water supply stubbed out at waterer locations, electrical conduit routed to lighting positions and any future fan or heat lamp circuits, and penetrations positioned where interior pen walls won't block access once construction closes in.[13] Licensed electricians and plumbers should handle this phase — wiring for outlets, lighting, and equipment must be integrated into the frame before insulation and liner panels go up, because retrofitting penetrations through a finished wall disrupts the structural envelope and costs far more than getting the sequence right the first time.[14]
Access point placement — where doors go and what path equipment uses to reach them — belongs at the same level of planning as structural framing, not as a field decision during erection. Framed openings for roll-up doors, curtain panels, and personnel entries are locked in at the kit design stage before any component ships, so door positions need to resolve traffic flow, tractor clearance, and feed delivery lines on paper first.[12] Test each opening against the interior layout: a door that conflicts with a pen gate or leaves a waterer in the swing arc creates daily friction that compounds across every production cycle.[12] For a working cattle shelter, farm equipment storage building dimensions are worth reviewing alongside door sizing — the same clearance logic that governs a combine also applies to a skid steer moving bedding or a feed wagon pulling alongside a bunk.
The delivery path to your site carries the same priority as any interior layout decision. The access route must be solid, wide, and clear, because a truck or crane stuck on a soft road delays every downstream task and adds real cost to an otherwise straightforward build.[13] Confirm the delivery schedule in advance and verify that seasonal ground conditions — spring thaw, post-rain softness, or unpaved approaches — won't compromise site access before the steel kit arrives.[13] A stuck delivery is one of the most avoidable delays on any prefab build, and a brief site assessment of the approach road before you place your order is the fastest way to stay on schedule.
Assembling the Steel Frame and Enclosure
Verify every numbered component within seven days of delivery, then start erection at the braced bay to stabilize the frame before adding remaining sections.
Step‑by‑Step Frame Erection Using Single‑Source Solutions
The single-source advantage becomes tangible the moment your steel kit arrives on site.
Every structural component ships numbered and matched to a layout drawing, so before any erection begins, verify each piece against the delivery note — this check must happen within seven days of delivery, while missing or damaged items can still be resolved without stalling the build.[15] Forklift unloading is required; have mechanical offloading on site before the truck arrives or you'll be paying a driver to wait.[15] Once the cured anchor bolts are confirmed square using the diagonal check dimensions supplied with your base plan, remove the timber templates and begin erection at the braced bay — the structural starting point that stabilizes everything added afterward.[15] Raise the first four columns, bolt the side bracing in place, then assemble the first two rafter sets on the ground before lifting them into position with correctly rated chains and slings; the weight of each component is listed on the loading sheet so you can spec the right lift equipment before erection day.[15] Eaves beams go in next, followed by purlins in sequence from the braced end toward the opposite gable — galvanized purlins arrive pre-cut and laser-etched with part numbers that correspond directly to the layout drawing, eliminating field cutting entirely.[15] Gable posts erect the same way as main columns, bolting into a slotted cleat on the underside of the rafter at the top; where knee bracing is specified, bolt it loosely to the column first, confirm the column is plumb and the eaves beam is level, then draw the brace up until the end hole centers on the eaves beam before tightening both connections.[15] When the frame is level and true, fill all anchor bolt cones with non-shrink grout to lock out any remaining movement — this step is what separates a structure that stays square for decades from one that shifts under seasonal load.[15] For a deeper look at how structural steel components are engineered to carry those loads reliably, that breakdown covers the load-path logic that makes pre-engineered sequencing so effective.
Installing Walls, Roof Panels, and Ventilation Systems
With the frame locked in and grouted, wall panels go on from the bottom up — each course overlapping the one below so water runs away from fastener lines rather than into them, secured with appropriate fasteners and sealants at every joint.[17] Trim and flashing at corners, door openings, and window frames install before adjacent panels close in around them, not after — they form the continuous moisture barrier at wall transitions, and retrofitting them once surrounding panels are set means cutting panels back to make room, which adds both labor cost and new leak points.[17] On a working cattle shelter, where manure acids and humidity put constant pressure on every surface, the goal at the shell stage is a weathertight envelope that protects animals and minimizes interior moisture stress — an outcome that depends on installation sequence as much as material choice.[12] The NSB metal roofing lineup pairs directly with pre-engineered steel frames for exactly this reason: panels arrive sized to the footprint, eliminating field cutting and the misaligned overlaps that create long-term leak paths.
Roof panels follow the same overlap-and-seal discipline, and the eave interface where roof panels meet wall panels is the highest-risk joint in the entire assembly.[17] On a monoslope cattle shelter, the low-slope rear eave concentrates runoff from the entire roof surface — flash that joint correctly before setting panels and runoff sheds cleanly; skip it and water wicks behind the wall panel at the most exposed corner of the building every rain event.[17] Once all panels are fastened and sealant is applied, the built-in ventilation openings become the final envelope component: a simple ridge opening or wall gap requires no mechanical system but must be sized and positioned during panel layout, not cut in as an afterthought.[16] Metal livestock shelters rely on these openings — whether a passive gap or a supplemental fan — to dissipate ammonia and other noxious gases before concentrations reach levels that suppress weight gain and increase respiratory disease pressure in the herd.[16] The galvanized coating on steel panels handles the long-term corrosion that those gases produce: where conventional materials degrade from repeated humidity and ammonia exposure, galvanized steel resists rust without ongoing maintenance, keeping the envelope structurally sound across multiple production seasons.[16]
Adding Doors, Windows, and Livestock‑Friendly Features
Door placement is where cattle social hierarchy creates a hard design constraint: a single entrance lets dominant animals station themselves at the opening and cut subordinate cattle off from shelter during storms or extreme heat.[18] Multiple entry points on the open face of a 20×40 build resolve this directly, giving lower-ranked animals an alternate route into the pen regardless of where dominant animals position themselves.[18] Operable windows on the enclosed north wall add controllable cross-ventilation beyond what curtain panels alone provide — proper ventilation and insulation contribute to better air quality, reduce the chances of respiratory issues, and help the herd regulate body temperature as seasons shift.[19] The downstream effect on production is measurable: comfortable animals eat more consistently and gain weight at a healthier rate, and the rest a quiet, secure pen provides aids growth, reproduction, and recovery from the day's activity.[19] Stress from inadequate shelter directly suppresses the immune system, increasing vulnerability to illness — which makes door count, window placement, and ventilation openings performance inputs, not optional upgrades.[19] Metal livestock shelters offer customizable options for size, style, and features across all of these categories, so decisions about supplemental openings, waterer positions, and pen divider layouts belong in the kit design stage rather than left as field modifications after the shell is closed in.[19]
Finishing Touches and Ongoing Maintenance
Rubber mats over concrete eliminate hoof wear while providing cushioning, traction, and insulation that reduce lameness risk from day one.
Interior Flooring, Bedding, and Comfort Enhancements
The concrete slab gives you a cleanable, acid-resistant base, but surface finish determines whether that floor helps or harms the herd. Cattle on new, unfinished abrasive concrete wear down their hooves 35% faster than cattle housed on dirt, and improperly finished slabs have caused lameness-driven culling within the first three weeks of barn occupancy.[20] The target finish sits between two failure modes: too rough and hooves abrade faster than they grow; too smooth and cattle slip when rising, which suppresses lying time and pushes lameness risk upward.[20] A practical field test — if the finished surface is uncomfortable to walk on barefoot, it's too rough for cattle.[20] Rubber mats over the concrete solve both problems at once: recycled rubber flooring systems provide cushioning, reliable traction wet or dry, and insulation against cold concrete that would otherwise draw heat away from resting animals.[20] Interlocking mat systems adapt to any pen configuration, clean down with alley scrapers or flush systems without lifting, and resist the manure and moisture exposure a 40×80 pole barn alternative or any working livestock shelter generates daily.[20]
Bedding selection is driven by three factors that interact directly: absorbency, particle size, and how the material fits your manure handling system.[21] Straw remains the most widely used option — easy to handle, readily available, and absorbent enough for standard deep-pack management.[21] Sand is the most comfortable material for cattle because their bodies conform directly to it during rest, but it absorbs poorly and creates significant disposal challenges when soiled.[21] Wood shavings hit the middle ground: good absorbency, proven comfort, and manageable with standard equipment, though sourcing from a reputable supplier is essential since certain wood species carry toxins.[21] Organic bedding materials — straw, shavings, chopped newspaper — reduce ammonia volatilization compared to inert materials, which directly improves air quality in an enclosed or semi-enclosed pen.[21] Regardless of material, a deep litter depth of four to eight inches provides the cushioned surface large animals need to absorb the impact of lying down, reducing sore hocks and swollen joints that compound over a full production season.[21] The most contaminated zones are at the front of resting areas where contact with manure is highest — target those spots first when adding fresh bedding or cleaning.[21]
Resting time is where flooring and bedding choices connect to production outcomes. Cattle lie down roughly 12 times per day, and studies have recorded daily resting times up to 14.33 hours — every additional hour of comfortable rest correlates with measurable gains in feed intake and weight gain.[20] A well-rested animal is more productive across every metric: growth rate, reproductive performance, and immune function all improve when cattle can lie down without discomfort.[20][21] Foam-core stall mattresses — particularly those using open-cell foam encased in a waterproof cover — retain their cushioning under repeated load cycles better than closed-cell alternatives, which compress and lose resilience over time.[20] For a bedded-pack setup inside a 20×40 livestock shelter steel build, the practical combination is a rubber mat system in high-traffic zones like feed alleys and entry paths, with managed deep bedding in resting areas — the mats handle traction and hoof health where cattle move most, while adequate bedding depth handles thermal comfort and joint protection where cattle rest.[20][21]
Seasonal Weatherproofing and Ventilation Adjustments
Ventilation isn't a set-and-forget decision — it's the one system you actively manage every time the weather shifts, and the adjustments are more precise than most operators expect. Your 20×40 livestock shelter steel build has three distinct operating modes tied directly to season, and running the wrong mode costs you in herd health before you see it in the production numbers. In cold weather, the target for an uninsulated cold barn is no more than a 10 degreesF temperature difference between inside and outside — exceed that gap and you're restricting ventilation enough to let humidity climb, which produces condensation on roof sheets and rafters and creates the foggy, smelly conditions that signal a dangerously under-ventilated pen.[22] For a 20-foot-wide building, proper cold-weather sizing calls for a continuous ridge opening of 4 inches — calculated at 2 inches of ridge width per 10 feet of building width — with sidewall openings at the top of both walls set to half that, or 2 inches per side.[22] Those openings should never fully close regardless of outside temperature; any sign of condensation on interior surfaces is the signal to increase the opening immediately, not tighten it down further.[23]
As temperatures rise into the mild and transitional range — spring, fall, and moderate winter days — shift to adjustable 4-foot-high sidewall openings above cattle level combined with operable end-wall openings or traffic doors, adjusting continuously to prevent humidity spikes while keeping drafts off the animals.[22] Curtain panels are the most practical hardware for this kind of frequent seasonal adjustment: they open wide for summer, throttle down for winter, and give you centralized control rather than requiring you to manually move panels in individual bays.[22] Summer operation flips the entire logic — the shelter functions as a sunshade and rain barrier, and achieving the 40 to 60 air changes per hour cattle need above 80 degreesF means opening all four walls from ground to roofline to capture every available breeze.[22] Cattle behavior is a reliable diagnostic here: bunching toward the center of the pen away from sidewalls is a direct signal that current ventilation is failing to cool the herd, not a pen design problem.[23]
Supplemental fans become necessary when natural ventilation can't reach the minimum cooling air speed of 200 feet per minute across every resting animal — a threshold that still air and low-speed airflow both fail to meet.[23] For a 20×40 footprint, position 48- to 55-inch fans above the resting area at 24- to 30-foot intervals, angling each fan to target the stall zone beneath the next fan in line, and activate them at a Temperature Humidity Index of 68 — the point at which cattle behavior and production performance begin to decline regardless of whether the thermometer alone would suggest a problem.[23] In southern climates across Texas, Oklahoma, and the Southeast, supplemental exhaust fans are often non-negotiable to hit adequate summer ventilation rates; in colder Midwestern and northern regions, the seasonal priority shifts to maintaining minimum winter air exchange without creating drafts at cattle level.[24] For producers weighing whether steel building insulation changes those ventilation calculations — moderately insulated barns can hold inside temperatures 30 to 40 degreesF above outside during extreme cold, but only when curtains and ridge openings are managed to prevent the humidity buildup that damages both cattle and the building envelope itself.[22]
Service Excellence: Inspection, Repairs, and Long‑Term Care
A 20×40 livestock shelter steel build earns its longevity through consistent inspection, not luck. Inspect the structure at minimum twice a year — once in spring after freeze-thaw cycles have stressed fasteners and sealants, and again before winter when drainage, seals, and roof loads matter most — and add a walkthrough after any major storm.[25] Each inspection should cover the same checklist of failure points in sequence:
- Roofing and siding panels for leaks, loose screws, and cracked sealant
- Doors, windows, and curtain panel seals for gaps and alignment
- Visible steel surfaces for rust spots or scratches exposing bare metal
- Anchor bolts, framing fasteners, and structural connections for looseness
- Posts and the foundation perimeter for shifting, settlement, or water intrusion
- Gutters and downspouts for blockages that back water against the building envelope[25]
Cleaning works in tandem with inspection because dirty surfaces hide problems and accelerate deterioration. On galvanized steel panels — the standard for any agricultural enclosure where manure gases and humidity are constant — trapped moisture at joints and panel laps is the primary driver of long-term corrosion, and a low-pressure rinse once or twice a year clears the debris that holds that moisture against panel seams.[25] Interior surfaces need the same attention: clutter and organic buildup in corners obscure cracks, pest entry points, and early signs of condensation damage that go unnoticed until they've grown into structural repairs.[25] A clean shelter is also a diagnostic tool — when surfaces are visible and clear, small issues like a weeping fastener hole or a bowing gate post announce themselves before they compound.
Structural integrity degrades slowly and unevenly, which makes systematic tightening as important as visual inspection. Seasonal temperature swings expand and contract steel connections, and fasteners that were torqued correctly at erection can loosen across multiple freeze-thaw cycles without showing obvious movement.[25] Check every bolt in the primary frame connections, knee braces, eave beams, and door frames during each semi-annual walkthrough, and tighten anything that has backed off before it allows the joint to rack under load.[25] Pest control belongs in the same routine: birds nesting in ridge openings block ventilation and accelerate corrosion with acidic droppings, while rodents entering through unsealed base trim compromise bedding hygiene and chew electrical conduit — both problems catch up to producers who treat pest management as optional upkeep rather than a structural maintenance task.[25] Scheduling a professional inspection every few years alongside your own semi-annual checks gives you a second set of eyes on the post bases and load-bearing connections that are hardest to evaluate without structural experience — and for producers weighing local prefab contractors for that work, vetting credentials before committing protects both your warranty coverage and your inspection outcome.[25]
- A 20×40 shelter holds 20-22 finishing cattle or 26 calves; social hierarchy requires 35-40 sq ft per head minimum.
- Site selection, orientation, and drainage determine long-term shelter performance–poor grading voids manufacturer warranties.
- Monoslope roof design with south-facing open wall captures winter solar gain while directing runoff away from feed.
- Full concrete flooring with lower wall protection resists manure acids and eliminates microbial reservoirs between groups.
- Natural ventilation through ridge openings and adjustable curtain panels manages ammonia without mechanical systems in most climates.
- Rubber mat systems over concrete prevent 35% faster hoof wear while interlocking designs adapt to any pen layout.
- Semi-annual inspections targeting fasteners, seals, and drainage prevent costly structural repairs and maintain galvanized steel longevity.
- https://extension.psu.edu/beef-cattle-spacing-requirements/
- https://www.umass.edu/agriculture-food-environment/crops-dairy-livestock-equine/fact-sheets/small-scale-dairy-calf-cattle-housing
- https://opensanctuary.org/building-a-good-home-for-cows/
- https://mortonbuildings.com/projects/livestock
- https://www.coast-to-coastcarports.com/get-your-livestock-ready-for-the-winter-season-with-metal-loafing-sheds?srsltid=AfmBOorbzgA-t8Wfx7tXbokl9Oet_tIsh3C3B_WGwhThiLzhoXhzncja
- https://www.uspatriotsteel.com/blog/how-much-does-a-20×40-metal-building-cost/
- https://www.eaglecarports.com/blog/metal-building-prices
- https://metalprobuildings.com/drainage-grading-tips-for-steel-building-sites/
- https://www.aquabarrel.com/pole-barn-drainage
- https://gensteel.com/steel-building-kits/stables/20×40-stable/
- https://www.americanmetalbuildings.com/metal-barns/?srsltid=AfmBOoqbc68ucEyMqpnxhKvFMN8RguYA3SNC9pgevF1rpHuyLHvdix6h
- https://titansteelstructures.com/metal-structure-tutorials/how-to-design-a-steel-livestock-shelter-with-our-3d-building-designer/
- https://buildway.com/metal-building-site-preparation-guide/
- https://lionbuildings.com/steps-involved-when-building-post-frame-metal-buildings-in-greensborough/4/
- https://www.kitbuildings.co.uk/erection-instructions
- https://www.coast-to-coastcarports.com/get-your-livestock-ready-for-the-winter-season-with-metal-loafing-sheds?srsltid=AfmBOop-MSahUvvXDvxmlb8miTPe-oSMnJyR5KIsb0PDAklh6Mco76zM
- https://cmtcomponents.com/blog/step-by-step-guide-to-building-a-pole-barn/
- https://alansfactoryoutlet.com/blog/loafing-shed/?srsltid=AfmBOopNSPp2QXlRNmKHuhHED_h_clCtntnBnJi_URiNsVR9YSYAw28I
- https://pricebuildings.com/metal-livestock-shelters/
- https://americandairymen.com/proper-dairy-flooring-and-mats-improve-cow-comfort-and-health/
- https://www.umass.edu/agriculture-food-environment/crops-dairy-livestock-equine/fact-sheets/bedding-options-for-livestock-equine
- https://extension.psu.edu/natural-ventilation-for-freestall-barns/
- https://thedairylandinitiative.vetmed.wisc.edu/adult-cow-housing/ventilation-and-heat-abatement/
- https://americansteelinc.com/blog/design-steel-barn-livestock/
- https://www.premierstructures.biz/blog/pole-barn-maintenance-tips/