
Converting a 30×40 barn into climate-controlled workspace requires structural assessment, permit sequencing, and careful planning of insulation, HVAC, and electrical systems to avoid costly mistakes.
Planning Your 30×40 Barn Conversion: Key Considerations
A structural assessment and moisture inspection will reveal whether your barn's bones are sound and what repairs your budget must prioritize before renovation begins.
Assessing Structural Integrity and Layout Potential
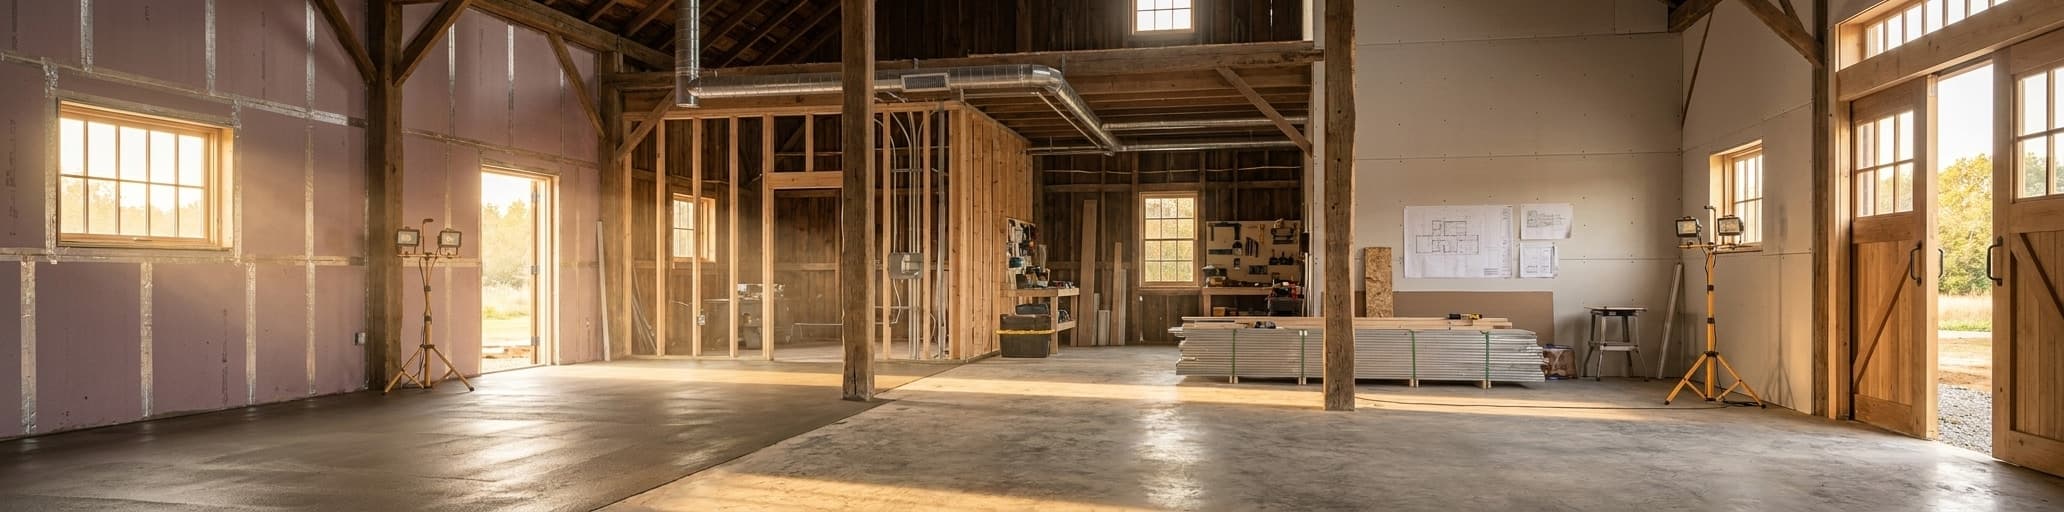
Before you sketch a single floor plan, a thorough structural assessment tells you what you're actually working with. The first step in any 30×40 barn conversion is confirming the bones are sound before spending a dollar on climate control, insulation, or finishes.[1] For most standing barns, that's an achievable baseline — an experienced contractor will tell you that if it's still upright, it can almost always be saved.[3] What changes is the cost and sequencing of repairs, which is why you assess first and budget second.[3]
Moisture is the single most destructive force acting on an aging barn structure, and it does most of its damage before you notice it.[3] Inspect the roof for gaps, sagging, or failed flashing — water infiltration rots sill plates and load-bearing posts from the inside out.[3] At the foundation perimeter, check that grading directs runoff away from the building, and remove any vegetation whose roots may be compromising the base.[3] While you're walking the interior, look for small boreholes in posts and beams with fine tan powder beneath them — that's an active Powder Post Beetle infestation requiring professional treatment before any renovation work starts.[3] Skipping this step means enclosing the problem inside your finished workspace.
Once you've confirmed structural viability, the same walk-through reveals your layout options. A 30×40 footprint delivers 1,200 square feet of potential clear-span workspace, but the existing column and post placement will determine where HVAC equipment, electrical panels, and partition walls can realistically land. Structural reinforcement of the existing frame is typically permitted and may be necessary to carry the added weight of insulated panels and mechanical systems.[2] Bring in a structural engineer alongside your contractor early — professionals who understand timber frame construction can identify which modifications are safe and which original framing members need to stay exactly where they are.[3]
Understanding Zoning, Permits, and Compliance
Converting a barn to a climate-controlled workspace triggers a fundamentally different regulatory path than maintaining it as an agricultural structure. The moment you add conditioned space, electrical systems, or plumbing, most jurisdictions strip any agricultural exemption and require a full building permit — regardless of the barn's age or existing footprint.[6] Pennsylvania's Uniform Construction Code makes this explicit: the agricultural exemption covers only structures used solely for livestock or equipment storage, and adding any habitable space removes that protection entirely.[6] The same logic applies in most U.S. jurisdictions, so treat your 30×40 barn conversion as a new construction project from a compliance standpoint from day one.
Zoning is the first gate, not the building department. Your local zoning code controls whether a converted workspace is a permitted use on your parcel at all, and it sets the non-negotiable parameters: setbacks from property lines, maximum lot coverage, and building height limits.[4] A barn sitting close to a side lot line may have been grandfathered as a farm outbuilding but lose that status the moment its use changes.[5] Check your zoning district and pull the specific setback dimensions for your parcel before finalizing any floor plan — a conversion that violates a setback requires a variance, which adds months and real uncertainty to your project.[4]
Once zoning clears, permit sequencing determines your construction schedule. Most jurisdictions follow a fixed order: zoning approval first, then the structural building permit, then separate trade permits covering electrical, mechanical, and plumbing work.[5] Many areas offer a combination permit — a single permit number covering all structural and trade work — which simplifies tracking inspections and avoids the administrative gap between disconnected applications.[4] For a state-by-state breakdown of how permit sequencing works for building additions and conversions, permit requirements shift considerably depending on your location. Skipping any part of this chain isn't a minor oversight: penalties for unpermitted work range from double to quadruple permit fees, and each day a violation persists can be treated as a separate offense.[5] Rough electrical, mechanical, and framing work must stay visible for inspection before walls close — plan your construction schedule around inspection windows, not around your preferred completion date.
Budgeting and Cost Estimation for a Climate-Controlled Workspace
Cost is where most 30×40 barn conversion projects go sideways — not because the numbers are prohibitive, but because owners budget for the shell and forget the systems that make the space actually usable. A basic uninsulated post-frame shell covering framing, siding, roof, and doors runs $35,000-$45,000 depending on site conditions and regional labor.[9] Bring in a concrete floor, a few windows, and light insulation, and the project lands in the $55,000-$75,000 range.[9] A fully conditioned workspace — HVAC, electrical, loft storage, and finished interior walls — pushes the total to $90,000-$120,000 or more.[9] For context, professional pole barn construction averages $27,500 for a basic build at $15-$40 per square foot, but that figure assumes no meaningful climate control.[8] Before you finalize scope, build these line items into your working budget:
- Permits: $500-$2,500 depending on jurisdiction and trade permits required[8]
- Site preparation (grading, access improvements, partial demolition): $1,200-$8,000[8]
- Concrete flooring: $4-$8 per square foot[8]
- Insulation installation: $1-$3 per square foot[8]
- HVAC technician labor: $50-$100 per hour[8]
For a line-by-line look at what drives total spend on a 1,200-square-foot footprint, the 30×40 total project cost breakdown separates kit price from installed price — a distinction that changes your financing math considerably. Two levers reliably keep a conversion within budget without cutting structural corners: scheduling trade work in the off-season when labor rates soften, and sequencing site prep and concrete before finalizing your HVAC design so mechanical rough-ins don't require breaking a finished slab.[7] The table below summarizes the three cost tiers a climate-controlled 30×40 barn conversion typically falls into.
| Build level | Typical scope | Cost range |
|---|---|---|
| Basic shell | Framing, siding, roof, standard doors | $35,000-$45,000 |
| Mid-range | + Concrete floor, windows, light insulation | $55,000-$75,000 |
| Fully finished | + HVAC, electrical, interior finishes, loft | $90,000-$120,000+ |
Designing an Efficient, Climate-Controlled Interior
Choosing the right wall insulation and vapor barriers from the start prevents costly condensation problems and keeps your barn conversion comfortable without straining your HVAC system.
Choosing Insulation and Vapor Barriers for Optimal Comfort
R-value measures thermal resistance — the higher the number, the harder the insulation works to block heat transfer in both directions.[10] For a 30×40 barn conversion, hitting the right R-value in each zone is what separates a space that's merely enclosed from one that holds a stable temperature without overworking your HVAC system.[11] Walls carry the most surface area in any converted barn, so wall insulation is the first and most impactful decision you'll make.[10] Four materials cover that job:
- Fiberglass or mineral wool batts suit post-frame construction especially well because 8-foot post spacing creates long, uninterrupted spans that accept full batts with minimal gaps. Target R-21 or higher.[10]
- Spray foam expands to fill every crack and resists both airflow and moisture, but install a vapor layer between the foam and any steel panels so panels can be swapped later without disturbing the insulation.[10]
- Blown insulation (fiberglass, mineral wool, or cellulose) is chemically treated so it adheres to wall surfaces, then covered with plastic sheeting to hold it in place behind the interior finish.[10]
- Rigid foam board (XPS is the industry benchmark) won't sag or compress over time and comes in tongue-and-groove configurations that create a tight seal against air, moisture, and pests.[10]
Vapor barriers belong in your material budget from day one, not as a retrofit.[11] Condensation forms wherever warm interior air meets a cold surface, and in a converted barn that means the underside of the roof, uninsulated wall cavities, and the slab edge.[11] A double-bubble barrier installed between roof panels and trusses tackles ceiling condensation at the source.[10] At the foundation perimeter, a 2-inch foam-board barrier around the slab edge stops ground chill from conducting through the concrete and into your workspace.[10] For attic spaces, blown cellulose at R-38 or above is the most economical fill because it conforms to every gap without cutting, and layering it with a ceiling barrier gives rising heat two consecutive thermal stops instead of one.[10] For a deeper look at how these assemblies translate into long-term payback in metal-clad structures, the steel building insulation R-value and vapor barrier guide covers the full spec breakdown. Doors and windows close out the thermal envelope — insulated overhead doors rated at a minimum R-13.5 and windows selected for low air leakage and high condensation resistance prevent the energy losses that even perfect wall and ceiling insulation can't compensate for.[10]
Selecting HVAC Systems Tailored to a 30×40 Space
Sizing is where most barn HVAC decisions go wrong before a single unit is purchased. A 30×40 footprint with an open interior volume — no flat ceiling, loft overhead, peak running along the 40-foot length — is meaningfully different from a sealed residential room, and standard home sizing charts won't apply accurately.[14] The consistent answer from both online BTU calculators and on-site HVAC contractors for a 1,200-square-foot converted barn with 10-12-foot ceilings is a 36,000 BTU (3-ton) system, especially when the space is used year-round.[12] Resist the instinct to oversize. A unit too large for the space won't run long enough to pull moisture out of the air, leaving occupants with a cold, sticky environment that accelerates mold growth — and that's a real problem in a converted structure that already has moisture history.[13]
For barn conversions specifically, ductless mini-split systems are the most practical choice: no ductwork to run through existing framing, precise zone-by-zone temperature control, and year-round heating and cooling from one system.[14] A real-world 30×40 shop conversion landed on a 3-zone, 36,000 BTU Mitsubishi system — two 12,000 BTU wall units on the ground floor, one in the loft, all connected to a single outdoor condenser — installed with line covers and a new concrete pad for $8,951 including a 15-year manufacturer warranty.[12] That multi-zone approach matters: a single head unit can't distribute conditioned air evenly across 1,200 square feet when the ceiling height and loft create distinct thermal zones.[12] If you're committing to forced-air instead, ceiling-hung units eliminate the need for ductwork in workshop environments where aesthetics aren't a priority, and furnace efficiency is measured by AFUE — gas models range from 78% to 96%, so choose toward the top of that range.[13] Radiant floor or ceiling systems are worth considering if your doors stay open frequently, since radiant heat warms objects rather than air and doesn't lose its effect every time a door swings open.[13]
Cold-climate performance and efficiency ratings determine long-term operating cost more than purchase price. For cooling, both central AC and heat pump systems are rated by SEER — higher SEER means lower monthly bills, and utility companies in many areas offer rebates for high-efficiency installations worth factoring into your budget before you choose a unit.[13] On the heating side, heat pump mini-splits are rated by HSPF and can deliver efficient heat down to -13 degreesF with inverter technology, making them viable even in climates far colder than the mild winters where many converted barns operate.[12] Humidity management belongs in the same conversation as temperature: without adequate dehumidification, a 75 degreesF interior can feel like 85 degreesF, and high moisture accelerates the structural deterioration you worked to eliminate during framing.[14] Pairing your HVAC selection with the right insulation assembly — covered in the previous section — is what keeps the system from running continuously just to compensate for heat gain through the roof and walls; one real-world example showed that adding 2 inches of closed-cell spray foam to the roof dropped peak surface temps from 125 degreesF to 83 degreesF and shifted the mini-split from running wide open all day to maintaining a controlled 75 degreesF with ease.[12] For a full breakdown of how insulation choices interact with HVAC load calculations in metal-clad structures, the energy-efficient metal building compliance guide covers ASHRAE 90.1 thresholds and available tax deductions that apply to qualifying high-efficiency equipment.
Integrating Lighting, Electrical, and Smart Controls
Electrical planning is the system most owners underfund during a 30×40 barn conversion — and the one that's most expensive to fix after walls close. The non-negotiable baseline for any converted workspace running stationary power tools, a welder, or a compressor is a 200-amp service; step up to 400 amps if you're running a plasma cutter, TIG welder above 200 amps, or multiple high-draw tools simultaneously, because adding a new service entry later costs three to five times more than sizing it correctly during construction.[15] Install a 42-space panel minimum — even if you only need 20 circuits today — because panel space is the cheapest upgrade you'll ever buy, and running out of breaker slots in three years means adding a sub-panel rather than simply adding breakers.[15] Mount it on an interior wall near your service entry point with 36 inches of clear space in front, as required by the National Electrical Code.[15] Wiring a converted barn typically runs $5,000-$15,000 and accounts for 8-15% of total build cost depending on circuit count and equipment complexity, so for a realistic view of how electrical fits into the broader 30×40 cost breakdown by line item, budget it as a standalone trade package rather than folding it into your general contractor allowance.[15]
Circuit discipline is what separates a shop you can run hard from one that trips breakers mid-project. Every major tool needs its own dedicated circuit — sharing circuits between high-draw equipment causes voltage drops that damage motors and shutdowns that ruin work in progress.[15] A well-planned 30×40 workspace needs 12 to 20 dedicated circuits, and outlets placed every six feet along every wall, with additional ceiling-drop or floor-mount receptacles at island workbenches so extension cords never cross the floor.[15] Zone your receptacle types by function: 240V circuits at stationary tool positions, 20-amp GFCI-protected outlets near any water source or in unfinished areas, and weatherproof exterior outlets for equipment used outside the building.[15] Arc-fault circuit interrupters (AFCIs) are mandatory in specific areas under the National Electrical Code, and your inspector will confirm which zones apply to your jurisdiction.[15] Label every circuit at the panel — it's a small step that saves hours of tracing later and communicates clearly to any electrician working on the building after you.[15]
Lighting a 1,200-square-foot converted barn isn't just a fixture count question — ceiling height changes the math significantly because light intensity drops with distance, a principle known as the Inverse Square Law.[16] For a 30×40 footprint with 12-foot ceilings, the target is 50-75 footcandles across the general work area and 100+ footcandles at dedicated bench and machine stations, which translates to 75,000-105,000 total lumens for general illumination.[16] Eight to twelve LED high-bay fixtures rated at 10,000-15,000 lumens each, mounted at the truss or purlin level, hit that target reliably; supplement with LED strip or under-cabinet task lights at each workstation to eliminate the bench shadows that a single overhead row always creates.[16] If your barn has a loft or open ridge that pushes ceiling height to 15 feet or beyond, switch from linear 4-foot fixtures to UFO high-bay LEDs, which use focused lenses to push light downward efficiently at heights where standard shop lights scatter before reaching the floor.[16] For color temperature, 5000K (daylight) is the correct spec for any precision work environment — it provides the contrast needed to read measurements and identify small parts accurately, while lower temperatures like 3000K flatten detail and increase eye strain on long projects.[16]
Smart switching design is where the electrical and lighting systems connect into a controlled whole. Wire your lighting across at least two separate circuits so you can illuminate half the shop for a quick task without energizing the full system.[15] Install three-way switching between every entry point — a walk door and an overhead door each need switching at both ends so you're never crossing a dark shop to reach a switch.[15] Motion-sensor switches earn their cost in seldom-used zones: storage bays, bathrooms, and exterior lights all benefit from automatic shutoff that eliminates the energy bleed of lights left on overnight.[15] Future-proof the entire system by running conduit — not just Romex — through key wall and ceiling runs, with empty conduit pulled from the panel to each corner of the building and to the ceiling above your main work area.[15] That single decision lets you pull new wire for an EV charger, a sub-panel, or upgraded equipment without opening finished walls, which is exactly the kind of forward planning that keeps a converted barn useful for decades rather than obsolete in five years.[15]
Construction and Renovation Steps for Quality Results
Proper site preparation and structural assessment prevent costly delays later, keeping your barn renovation on schedule and within budget.
Preparing the Site and Reinforcing the Frame
Site preparation sets the pace for every trade that follows, so treating it as a standalone phase — not a half-day of housekeeping before the real work starts — keeps your schedule intact. The first tasks are clearing interior debris, making the existing structure safe to move through, and establishing temporary electrical service for tools and lighting.[17] Grading around the foundation perimeter comes next: surface runoff must drain away from the barn before any groundwork begins, because water pooling against a sill plate undoes structural repairs faster than anything else.[17] For barns in poor condition, underpinning existing footings or stabilizing compromised walls may be required at this stage — and any new drainage runs or concrete footing extensions for additions should be cut and laid while the site is still open, since reopening a finished grade later adds both cost and scheduling delay.[17]
Frame reinforcement is where the structural investment either pays off or gets skipped in ways that surface later as much larger problems. Most aging barns — timber-framed structures especially — need some combination of roof timber repair or replacement, wall reinforcement, or new structural steel components added to the existing frame to carry the added load of insulated panels, mechanical systems, and conditioned interior finishes.[17] A structural engineer determines which existing members can stay, which need sistering, and where new steel supports must integrate into the timber frame — without that assessment, you're guessing at load paths in a building that was never designed for the weight you're adding.[19] Pole barn conversions follow the same sequence: the frame is reviewed and strengthened where needed, and any roofline or wall modifications called for in the design are executed before mechanical rough-ins begin.[18] One sequencing rule applies regardless of barn type: get the structure sound and the roof watertight before any insulation or interior work starts, because enclosing a frame that is still wet or actively moving locks in the problem — and it reappears, expensively, years after the walls are closed.[17]
Installing Walls, Windows, and Doors with Precision
Wall installation in a 30×40 barn conversion delivers the most reliable results when you treat the existing barn skin as an imperfect weather barrier and construct a new conditioned envelope from the inside out.[21] The sequence that holds up under scrutiny: fasten horizontal girts between existing posts to create a 3/4-inch drainage gap between the original siding boards and your new assembly, then attach house wrap to the inside face of those girts.[21] Rigid polyiso foam board goes next — taped at every seam, caulked at post interfaces — eliminating the air bridging that open gaps create.[21] Interior 2×4 stud walls frame up inside the sealed foam layer, ready for drywall, OSB, or shiplap finish.[21] This sequence matters because it keeps the original siding and timber frame dry: moisture that finds its way through aged board-and-batten has a drainage path instead of a dead end packed with insulation.[21] One structural advantage already built into most old barns helps here — post spacing of 8 to 10 feet creates long, unobstructed wall cavities that accept full rigid panels without the thermal bridging that 16-inch stud framing creates.[20] A well-engineered wall assembly using those wide post bays can outperform a conventional stud wall on raw insulation value before you add a single additional inch of foam.[20] For anyone planning a 30×40 metal building with living quarters, this inside-out wall strategy also applies directly — the sequencing discipline is the same whether the outer skin is original barn siding or steel cladding.
Windows and doors are the two places where a tight wall assembly most commonly fails, and both failures trace to the same root cause: inadequate sealing at the penetration perimeter. Follow window and door manufacturer sealing guidelines exactly, because gaps at jambs and sills create the moisture infiltration points that even a well-executed wall cavity can't compensate for.[20] For window type, fixed-pane units deliver the tightest thermal performance; louvered and sliding glass pane options add natural ventilation but demand more precise flashing detail at the jambs and sill pan to prevent water tracking behind the interior finish.[22] An air/moisture barrier — installed on the exterior face of the insulation before any window or door unit is set — gives the assembly a continuous drainage plane so any incidental infiltration at fastener points sheds outward rather than wicking into the wall cavity.[20] On the door side, match the product to how the zone actually gets used: roll-up overhead doors open the largest footprint for equipment movement but consume overhead framing depth that matters in a converted barn with existing collar ties or loft framing; barn-style sliding doors suit wide, column-free bays but aren't practical where floor space is tight; walk-through man doors belong at every secondary entry point used for daily foot traffic.[22] In all cases, the air barrier installation and the product sealing step are not two separate decisions — they are one continuous operation, and skipping either one creates a leak path that shows up as moisture damage, mold, or HVAC overload after the walls are closed.
Finishing Touches: Flooring, Ceiling, and Interior Finishes
Flooring in a converted barn workspace is a two-stage decision: what goes under the slab determines long-term thermal performance, and what goes on top determines durability and function. A layer of sub-slab insulation — specifically A2V vapor-barrier insulation — installed before the concrete pour is the step most owners skip and later regret, because ground chill conducts directly through uninsulated concrete and fights your HVAC system year-round.[23] Once the slab is poured and cured, finish options range from bare sealed concrete at lowest cost and highest durability for heavy equipment, to epoxy coatings that resist oil penetration and chemical spills — a genuine consideration when the space will see vehicle maintenance, fabrication, or power tools.[24] Rubber tile or interlocking floor mats at standing workstations add fatigue resistance without any permanent surface modification, making them easy to reconfigure as your workflow changes.[24]
Ceiling construction is where thermal and structural decisions intersect in a converted barn. Ceiling-loaded trusses with joists spaced 24 inches on center give you a flat surface to attach sheetrock directly to the underside while still leaving an attic cavity above for blown-in insulation.[23] That cavity requires active ventilation — any dead attic space enclosed during a conversion must be ventilated at a minimum of 1/300th of the attic footprint area, provided at least half of that ventilation area sits in the upper half of the space; without that upper placement, the required ratio increases to 1/150th.[23] The most reliable way to achieve even airflow through the cavity is pairing enclosed vented overhangs with a vented ridge, creating a continuous low-to-high pressure path that prevents moisture from stratifying against the sheathing.[23] Sheetrock attached to those ceiling joists is the most common finish because it's fire-rated, accepts paint, and reflects artificial light back into the workspace — a real benefit across a 1,200-square-foot open floor plan where light distribution determines how well you can actually work.[24]
Interior wall finishes in a converted barn trade off differently depending on how the space will actually be used, and committing to one material before thinking through your workflow is the decision owners most often want to redo. Plywood is the most practical choice for active workshops: lightweight, easy to install, and strong enough to support wall-mounted shelving, pegboards, and tool hooks without backing plates or special fasteners.[24] OSB covers larger spans on a lower material budget but absorbs water permanently — swelling rather than drying back to shape — so it functions as underlayment behind other finishes, not as a standalone finished wall surface.[24] Drywall is the right call when the space includes a conditioned office area, bathroom, or any zone requiring fire-rated assemblies; match the product to the zone (moisture-resistant in wet areas, Type X where code mandates fire resistance) and always complete insulation before hanging panels, because attaching drywall directly to metal surfaces without an insulation layer traps moisture at the interface and accelerates exactly the structural deterioration you eliminated during framing.[24] Interior 29-gauge steel liner panels are worth the cost premium in bays where forklifts, tractors, or heavy equipment operate — the material is highly durable, improves light distribution through reflectivity, and protects the insulation layer from mechanical damage.[24] For a general-purpose farm shop, a split finish puts plywood on the lower portion for tool mounting and impact resistance, steel liner above, delivering the practical advantages of both materials at lower overall cost than lining the full wall in steel.[24]
Managing the Project and Ensuring Long-Term Success
A general contractor's 10-20% fee pays for itself through supplier discounts, proper sequencing, and accountability that prevents costly coordination failures.
Hiring the Right Contractors and Single-Source Solutions
For a 30×40 barn conversion involving structural repairs, HVAC, electrical, and plumbing, a general contractor is worth the 10-20% management fee — not as overhead, but as a coordination mechanism that keeps licensed trades moving in the right sequence without gaps.[25] A GC handles permit applications, inspection scheduling, and subcontractor management from a single point of contact, which removes the administrative burden that derails owner-managed projects when one trade falls behind and cascades into the next.[25] The financial case is more nuanced than it appears: GCs often negotiate discounted rates from their regular suppliers and subcontractors, which partially offsets the management fee — and poor subcontractor coordination by an inexperienced owner typically costs more than any savings from cutting the GC out entirely.[25]
Subcontractor accountability is where the single-source model earns its value most clearly. When a general contractor hires subcontractors, the GC bears partial responsibility for the quality of their work — including liability exposure if subcontractor errors generate third-party claims.[26] That accountability structure forces a good GC to vet subs carefully, require proof of insurance (general liability and workers' compensation at minimum), and inspect finished work against project specifications before it gets covered by the next trade.[26] Split contracting — purchasing a building kit separately and hiring a different contractor to erect it — distributes accountability in a way that's nearly impossible to enforce: if panels don't align or drawings contain errors, the kit supplier and the erection contractor point at each other, and you absorb the delay and cost.[27] Most established contractors won't take erection-only work on customer-supplied kits for exactly this reason — unified accountability requires a single contract.[27]
Vetting any contractor for a barn conversion comes down to four non-negotiables: licensed, bonded, and insured with verifiable references (not just online reviews); demonstrable experience with permit sequencing for structures shifting from agricultural to commercial use classification; a contract with explicit timelines and line-item pricing rather than vague scope language; and a payment schedule that doesn't front-load your financial risk before work is verified.[25] For a detailed vetting framework built around prefab and steel building contractors, those criteria separate contractors who've navigated the agricultural-to-workspace regulatory transition from those encountering it for the first time. A contractor who asks specific questions about your project goals before quoting — load requirements, jurisdiction, intended use — is the clearest signal you're working with someone who has run this process before and can keep your project within budget every step of the way.[25]
Project Timeline, Communication, and Problem Solving
Scheduling backwards from your target completion date is more reliable than scheduling forward on a 30×40 barn conversion. Start with the date you need the space operational, then work back through each phase — inspections, interior finishes, mechanical rough-ins, framing, and site prep — to set realistic start windows for every trade.[30] Before any physical work begins, lock in materials and confirm subcontractor schedules; most project delays trace back to something that should have been ordered two weeks earlier.[30] Build a contingency reserve of 10-15% into your working budget specifically for unexpected costs, since even well-planned conversions encounter concealed damage, supply disruptions, or permit revisions that compress your timeline without warning.[29] A site diary maintained from day one — logging decisions made, delivery confirmations, and inspection outcomes — gives you an auditable record that resolves disputes quickly and keeps the schedule honest when memories differ.[28] For a clear picture of how material delivery and fabrication windows interact with your on-site phases, the prefab building kit delivery timeline guide breaks down what happens between order placement and the first truck arriving on your property.
Communication gaps between you and your contractors cause more delays than material shortages do.[30] If you're owner-managing the build, the responsibility for keeping information flowing sits with you, not with the trades.[28] A scheduled weekly update — what happened last week, what's planned for the next seven days, and any open decisions that need to be made before work stalls — eliminates the reactive calls that derail productive mornings and erode contractor confidence.[30] Match the channel to the person: a detailed email to a tradesperson who responds only on WhatsApp is slower than silence, and the cost shows up in scheduling gaps rather than invoices.[28] Indecision compounds that problem. Every delayed choice between materials, finishes, or mechanical options risks pushing the next trade out of their scheduling window and adding days to a timeline already under pressure.[28]
Problems will surface on any barn conversion — hidden moisture damage after walls open, a supply delay on a specialty door unit, an inspection that flags something no one anticipated. Recovery speed depends almost entirely on how you respond.[28] The confrontational reaction is the one to override: a calm, solution-focused conversation with the contractor involved resolves faster and preserves the working relationship you need to carry the project through to close.[28] Ask for help when technical questions exceed your knowledge — experienced project managers consult specialists regularly, and the assumption that you should already know an answer is precisely how small problems become expensive ones.[28] Organizational discipline reinforces all of it: a site with clear pathways, materials staged logically, and debris removed tells every arriving trade that you run a professional operation, which directly influences whether they show up on time and work efficiently or lose momentum navigating a disorganized environment.[28]
Maintenance, Energy Efficiency, and Future Expansion
A converted barn workspace needs a recurring maintenance calendar, not reactive repairs when something fails. Moisture remains the primary long-term threat after conversion — the same forces that damaged the original structure don't stop acting on it once the walls are closed.[32] Annual inspection of roof penetrations, window and door seals, and the foundation perimeter catches the small failures before they compound into structural damage.[32] Clearing gutters and downspouts after every heavy leaf fall, reapplying sealant at flashing joints every two to three years, and checking that perimeter grading still directs runoff away from the building are the three maintenance tasks that consistently prevent expensive repair cycles from developing.[32] Farms and agricultural facilities that already operate with scheduled equipment maintenance intervals benefit from treating the building the same way: inspect, document, and act before the problem grows.[31]
The wide, unobstructed roof plane of a 30×40 barn conversion is an asset for renewable energy integration that most owners underuse. Solar panels suit the large expanse directly, and pairing a rooftop array with an air source heat pump creates a partially off-grid conditioning system that reduces operating cost year-round.[33] Biomass boilers are a practical alternative in rural locations where wood fuel is locally available, while ground source heat pumps work well on properties with enough land to run a loop field.[33] One no-cost thermal advantage worth preserving: exposed stone or masonry interior walls — where they survive in the original barn fabric — function as thermal mass, absorbing heat during peak hours and radiating it back overnight, which reduces how hard your HVAC system has to work at the day's temperature extremes.[33] For a deeper look at how renewable systems interact with insulation assemblies in metal-clad structures, the energy-efficient metal buildings compliance guide covers ASHRAE 90.1 thresholds and the tax deductions that apply to qualifying installations.
Expansion planning belongs in the original design, not a future conversation after the conversion is complete. Most jurisdictions permit extensions to converted agricultural buildings under a "necessary" standard, but that word is interpreted differently by every planning officer — the time to test that interpretation is before completing the original conversion, when you still have leverage in the planning discussion.[33] Class Q updates have clarified the path for agricultural-to-residential and agricultural-to-workspace conversions, but extensions remain a separate application with less predictable outcomes.[33] Vertical expansion — a loft, mezzanine, or upper-level storage platform — is often more achievable than footprint additions, but the structural cost is real: supporting a new floor level typically requires opening or reinforcing the existing slab, which means the framing for a future loft should be engineered into the original structural design rather than retrofitted later at two to three times the cost.[33] For a 30×40 barn conversion that may need additional bays as operations grow, building the steel frame farm building system with expansion connection points already engineered into the endwall is the single decision that keeps future growth cost-effective and on schedule.
- Structural assessment and moisture inspection must happen before any renovation spending to avoid enclosing hidden damage.
- Converting agricultural barns triggers full building permits and strips agricultural exemptions, requiring regulatory compliance from day one.
- Climate-controlled 30×40 barns cost $90,000-$120,000+ fully finished; budgeting for HVAC, electrical, and insulation prevents cost overruns.
- Ductless mini-split HVAC systems with 3+ zones prevent moisture and uneven conditioning in converted barns with lofts.
- 200-amp electrical service with 42-space panels and dedicated circuits for major tools prevents breaker trips and equipment damage.
- Inside-out wall assembly with drainage gap, house wrap, and rigid foam protects original timber frame from moisture infiltration.
- Backward scheduling from completion date and weekly communication with contractors eliminate delays better than forward planning.
- https://www.lemon8-app.com/@roadtripusa123/7511647258295665198?region=us
- https://www.ikonic-architecture.co.uk/post/unlocking-the-potential-of-barn-conversions
- https://mibarn.net/resources/faq/
- https://www.portland.gov/ppd/residential-permitting/home-projects/garage-shed-and-accessory-structures
- https://www.racinecounty.gov/departments/public-works-and-development-services/development-services/development-services-faq-list
- https://www.newhollandsupply.com/blog/uncategorized/barndominium-regulations-in-pa
- https://themetalshopllc.com/how-much-does-it-cost-to-build-a-30×40-pole-barn/
- https://www.angi.com/articles/how-much-does-it-cost-build-pole-barn.htm
- https://www.dutchbuilders.com/blog/designing-30×40-post-frame-garage-workshop
- https://buildingsbytimberline.com/pole-building-insulation-zones/
- https://cmi-insulation.com/why-pole-barn-insulation-matters-energy-savings-comfort-year-round/
- https://jayscustomcreations.com/2019/08/30×40-shop-part-7-climate-control-overview/
- https://info.fbibuildings.com/blog/pole-barn-heating-cooling-methods
- https://absolutecomfort.org/cooling-pole-barn-indiana/
- https://wvpfco.com/blogs/building-insights/pole-barn-hobby-shop-electrical-planning-wiring-guide-indiana
- https://www.beeslighting.com/blogs/ideas-advice-blog/how-many-shop-lights-do-i-need
- https://www.diydoctor.org.uk/projects/barn_conversion.htm
- https://bgcnow.us/convert-a-pole-barn-into-a-house/
- https://www.veldarchitect.com/blogs/post/converting-barns-to-homes-top-10-things-to-know-before-starting-your-project
- https://www.wickbuildings.com/blog/five-tips-insulate-pole-barn/
- https://www.greenbuildingadvisor.com/question/insulating-advice-from-inside-out
- https://www.bargainbarnsusa.com/how-to-convert-your-metal-building-into-your-dream-home
- https://www.hansenpolebuildings.com/2012/04/climate-controlled/?srsltid=AfmBOopiDDFPD3tgVG6oRyfTtaCSZ8eOsn93fyTiwfPd6YrKkkPQOqtP
- https://info.fbibuildings.com/blog/pole-barn-finishing-options
- https://www.angi.com/articles/pros-cons-hiring-general-contractor.htm
- https://mycoitracking.com/who-is-responsible-for-subcontractors-work/
- https://www.steelstructuresamerica.com/pole-barn-kit-vs-turnkey-cost/
- https://www.self-build.co.uk/common-project-management-problems-avoid/
- https://alltimberframes.co.uk/self-build/common-mistakes-in-self-build-projects-and-how-to-avoid-them/
- https://cedreo.com/blog/how-do-contractors-streamline-projects/
- https://bradfordbuildings.com/upgrading-your-existing-structure-when-and-how/
- https://woodfordbarnrepair.com/old-barn-what-should-i-do-with-it/
- https://www.homebuilding.co.uk/advice/how-to-convert-a-barn