
We walk you through locking in scope decisions, sequencing five project phases, and coordinating slab work with steel erection to keep your 20×40 building on schedule. Solid planning upfront–from geotechnical investigation through anchor bolt placement and cure-window management–eliminates costly field conflicts and protects your erection window.
Planning the 20×40 Building Slab and Erection Sequence
Lock in your building's use, openings, and utilities before design starts to cut weeks off permitting and avoid costly fabricator assumptions.
Defining Project Scope and Milestones
Scoping a 20×40 building slab and erection project means locking in the decisions that drive your entire timeline before any concrete is ordered — building use, door and opening locations, insulation needs, and utility requirements.[1] The clearer those goals are at the outset, the faster the design phase moves, and the less time permit reviewers spend returning incomplete submittals.[1] Once scope is fixed, a realistic milestone map runs through five sequential phases: design and planning (2-4 weeks), permitting and engineering (3-6 weeks), steel fabrication (4-8 weeks), site prep and foundation work (1-3 weeks), and erection (1-3 weeks), putting total project duration at 10-20 weeks.[1] Slab work for a footprint this size typically takes less than a week of active labor, but cure periods and inspection windows still need protected time on the schedule — so build that buffer in from day one rather than discovering the gap after your erection crew shows up.[1] For a comparable footprint, the 30×40 concrete slab cost breakdown shows exactly how use-case decisions flow into thickness choices and budget line items before a single form board is set.
Integrating Design Documents for Clear Communication
Design documents that leave gaps force your fabricator and erector to fill them with assumptions — and wrong assumptions cost money.
The ANSI/AISC Code of Standard Practice requires structural design documents to provide enough information for fabricators and erectors to bid accurately, including depictions of all connections appropriate to the transmitted forces along with any required stiffener or doubler plates.[3] Showing beam reactions broken out as separate dead, live, wind, and seismic loads matters just as much: it lets the connection engineer apply ASCE 7 load reductions, which is impossible when conservative blanket values are substituted instead.[3] On the coordination side, integrating architectural, structural, and MEP models into a single federated BIM environment lets clash detection tools surface physical conflicts before construction starts — when fixes cost far less than field corrections mid-pour.[3] The underlying logic is consistent across both disciplines: the impact of good planning is highest early in a project, where the cost of issues during construction far exceeds the cost of resolving them during design.[3] For a 20×40 building slab and erection project, solid documents mean anchor bolt patterns, utility sleeve locations, door framing dimensions, and connection details are all resolved on paper before your erection crew arrives — so neither the pour schedule nor the steel sequence loses a day to missing information.
Establishing a Single-Source Coordination Team
When a 20×40 building slab and erection project splits civil prep, concrete foundations, and steel erection across separate firms, handoff gaps multiply — and every gap is a day where work stops waiting for another subcontractor's schedule to align.[4] A single-source coordination model eliminates that churn by placing site development, concrete work, and steel erection under one contract and one team, so anchor bolt placement, utility sleeve conflicts, and inspection windows are managed as a unified scope rather than passed between parties.[5] The schedule math supports the approach: bringing the GC into preconstruction at the schematic design stage saves 8 to 15 percent on hard costs compared to late-stage value engineering, and design-build delivery compresses total project schedule by 15 to 25 percent versus fragmented design-bid-build approaches.[6] Prioritize contractors who self-perform both civil and structural scopes — a GC who subs out the slab to one firm and the steel to another hasn't centralized accountability, only added a management layer to the same coordination problem — and use a structured vetting process like the steel building contractors near me guide to confirm that capability before you sign.
Optimizing Site Preparation and Foundations
A $2,000 to $5,000 geotechnical investigation upfront costs far less than fixing foundation problems discovered after steel erection begins.
Ensuring Soil Stability and Quality Control
The subgrade — the native soil your slab sits on — has one job: stay put. Any organic material like topsoil or roots must be stripped out before compaction begins, because decomposing organics create voids that cause slabs to settle and crack.[7] The remaining soil then gets compacted to at least 95% of its maximum density using heavy rollers, creating the stable, unmoving base your 20×40 building slab and erection sequence depends on.[7] When native soil is weak, saturated, or clay-heavy, stabilization beats full excavation on both cost and schedule: lime chemically alters clay particles to eliminate swelling and stickiness, while Portland cement mixed into the existing soil hardens into a rigid platform that meaningfully raises load-bearing capacity.[7] Before any of that work starts, a geotechnical investigation — typically $2,000 to $5,000 for a light commercial footprint — gives you Standard Penetration Test N-values at depth.[8] Single-digit N-values at shallow depths mean loose or soft material that your foundation design must account for; discovering that after mobilization and poured footers costs far more to fix than the geotech report ever would.[8] For regional context on how soil type varies and what foundation approaches perform in different climates, the metal buildings with concrete NC regional guide covers those variables in practical detail.
Quality control doesn't end once the subgrade is prepared — it intensifies during fill placement. Every lift of engineered fill must be compacted to 95% of the Modified Proctor maximum dry density, confirmed by nuclear density gauge testing before the next lift goes down.[8] Skipping that verification step is how settlement happens: under-compacted fill compresses over time, cracking the slab above it and potentially compromising anchor bolt alignment before steel erection even begins.[8] A 4-to-6-inch compacted gravel or crushed stone subbase above the prepared subgrade adds another layer of protection, distributing loads evenly and acting as a capillary break that keeps moisture from wicking up through the concrete.[7] Proper site grading to direct surface water away from the footprint — combined with free-draining subbase material — keeps the subgrade dry through the full cure period and well into the building's service life.[7]
Setting Up Formwork and Reinforcement for Precision
Good formwork starts with straight, undamaged lumber — 2×6 boards for the 5-to-6-inch slabs common on steel building footprints — staked at 3-to-4-foot intervals along the outside edge to resist the lateral pressure wet concrete exerts.[9] Before the first truck arrives, set forms to the correct elevation and slope using a laser level or transit, then check diagonal measurements between opposite corners: matching diagonals confirm your slab is square, which means the anchor bolt pattern will line up with the fabricated steel frame above it.[10] Apply form release oil to wood forms before placement; skipping it causes the concrete to bond to the lumber and chips the slab edges when you strip the forms.[9]
Reinforcement for a 20×40 building slab and erection project typically means a rebar grid or welded wire mesh with 12-to-18-inch spacing, scaled to expected loads, and doubled rebar around the perimeter where base rails and anchor bolts concentrate force.[10] The placement detail most crews miss: mesh that sinks to the bottom of the slab during the pour contributes almost nothing structurally — use chairs or bolsters to hold reinforcement in the middle or upper third of the slab depth before concrete arrives.[9] For guidance on how thickness choices interact with reinforcement requirements across different use cases, the choosing concrete thickness for 30×40 steel buildings guide covers those trade-offs in detail. Inspect bar sizes, spacing, and concrete cover against the structural drawings before ordering trucks; a few minutes of verification now prevents conflicts no finisher can correct after the pour.[9]
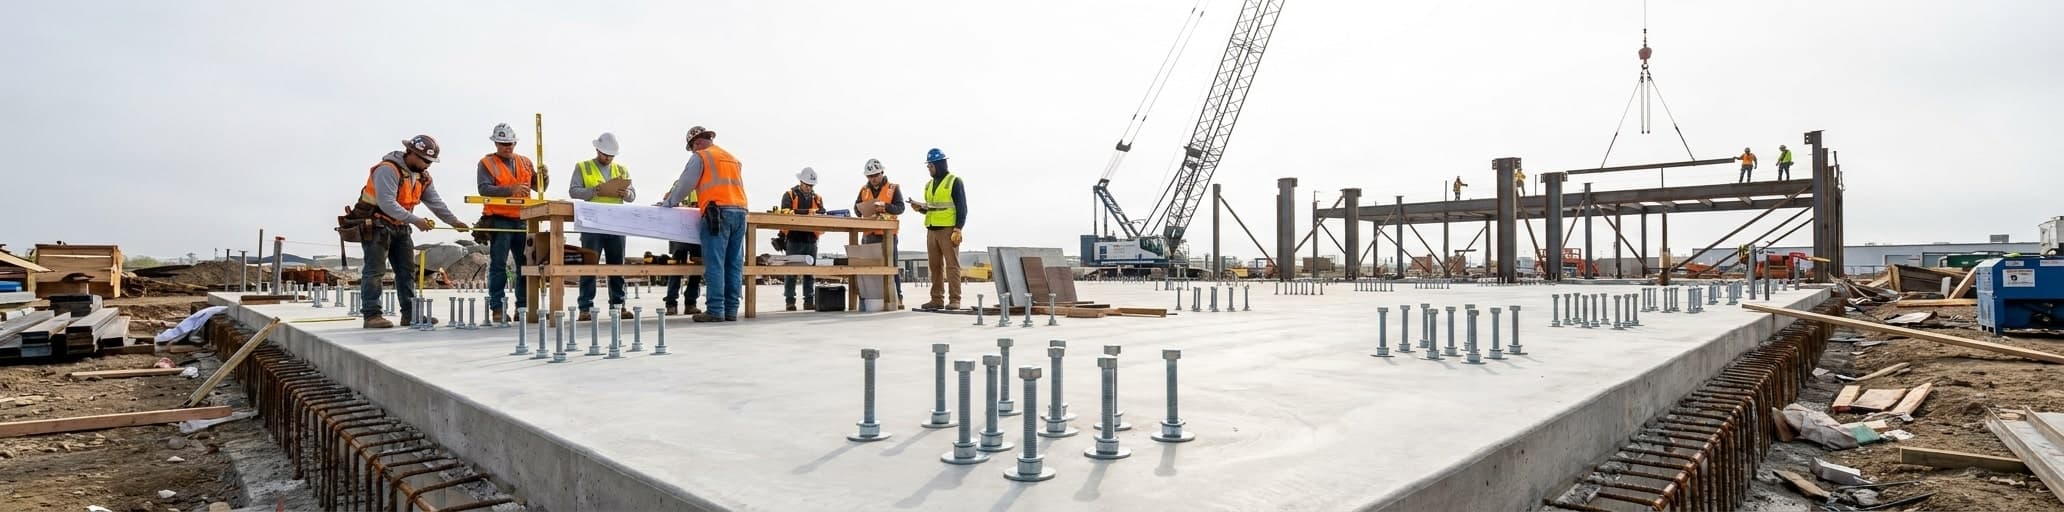
Anchor bolt placement is the single detail that connects your slab directly to the steel erection sequence that follows. Bolt locations must match the fabricated frame exactly — misaligned bolts delay installation and can require costly slab modifications before a single column is set.[10] Use the same window to install all under-slab conduit, plumbing sleeves, and electrical stub-outs, positioning each one at the exact fixture location called out in the MEP drawings.[11] Cutting into finished concrete to relocate a missed sleeve costs far more than the coordination time required to confirm positions before the pour begins.[11]
Scheduling Utilities and Access for Seamless Workflow
Underground utilities aren't a supporting task — they're on the critical path. Utility installation can physically block crane paths, staging areas, and footing excavation, so sequencing utility work ahead of structural activity is what keeps your 20×40 building slab and erection schedule from stalling at the worst possible moment.[12] A baseline sequence that holds up in the field: run utility conflict investigation first to surface unknown buried lines before any excavation begins, establish erosion control and temporary access roads next, then rough grade to create working room for trenching, install deep utilities and main runs before shallow lines, and complete fine grading and compaction testing before slab or paving work begins.[12] Rushed trench backfill is one of the most common schedule shortcuts that turns into a long-term problem — under-compacted trenches settle beneath slabs and paving, producing cracks and callbacks that cost more to fix than the days you thought you gained.[12]
Temporary site infrastructure needs to go in early for the same reason crews need a dry, level subgrade: without it, daily operations stall. Water, power, and sanitation access are required from day one, and temporary site roads let trucks and equipment move without turning staging zones into mud-bound bottlenecks.[13] Fencing, clearly marked entry points, and posted signage aren't just code compliance — they define equipment flow patterns and no-go zones that prevent crane operations from conflicting with active utility trenching or concrete delivery.[13] Coordination with local utility providers and municipal permit offices needs to happen well before mobilization, because delays at the permitting and connection stage cascade directly into pour and erection windows downstream.[13] Put scope responsibilities for trench backfill, compaction testing, and temporary restoration in writing between all trades before work starts — unclear ownership at those handoffs is one of the most consistent sources of delay on projects at a footprint exactly like this one.[12]
Executing the Slab Pour with Quality and Safety
Coordinate truck cycle times with pump output rate to eliminate cold joints and prevent costly equipment standby delays during your pour.
Managing Concrete Mix Selection and Delivery
Mix selection comes down to two questions: what loads will the slab carry, and how does the truck reach the pour area? Commercial equipment pads, industrial floors, and agricultural facilities generally require high-strength mixes to meet engineering specifications for heavier sustained loads; standard-use shop slabs and light storage applications can often use standard-strength concrete.[15] Access dictates format: when a truck can reach the pour zone directly, a regular mix works fine; when concrete must travel through hose lines, a pump mix with smaller aggregate is required — attempting to push a standard aggregate mix through long lines causes blockages that halt the pour entirely.[15] Weather compounds both decisions: heat accelerates set times, humidity affects workability, and each variable may point toward a more fluid mix or a set-control admixture before you place a single yard.[15] For a 20×40 building slab and erection project with anchor bolts and embedded sleeves already positioned, a mid-pour stop to clear a blocked line can compromise placement around those embedments before finishers can correct it.
Delivery cadence is where pour logistics succeed or fail. Coordinating truck cycle times with pump output rate keeps the hopper continuously fed and eliminates cold joints — planes of weakness that form when fresh concrete contacts partially set material — and equipment standby time drops when plant dispatch, fleet routing, and pump setup operate on a single schedule.[14] The planning math is straightforward: confirm total yardage, target pump output rate, plant-to-site travel time, and minimum truck count before the first load is dispatched.[14] In summer conditions, scheduling an early start, dosing a set retarder, and pre-arranging admixture adjustments at the pump hopper protects workability over a multi-hour pour window without sacrificing compressive strength targets.[14] Field technicians should verify slump, air content, and temperature on each arriving load per ASTM C94 — adding water on-site to correct a stiff mix degrades both pumpability and long-term strength in ways no finishing technique can recover.[14] Aligning mix design, delivery intervals, and pump output before mobilization keeps your pour within budget and protects the erection window that follows.
Coordinating Pour Timing with Steel Erection Windows
The pour-to-erection handoff is the most schedule-sensitive transition on a 20×40 building slab and erection project, and it carries two simultaneous requirements: the slab must reach structural strength, and the erection crew plus crane must arrive within a weather window narrow enough for safe lifts.
ACI 347 guidance sets the minimum threshold at 75% of 28-day design strength before construction loads can go on — which means scheduling your erection crew's mobilization against cylinder break data, not a fixed calendar assumption.[16] Cold weather is the most common source of miscalculation here: strength gain slows dramatically below 40 degreesF, stretching a 7-day cure expectation to 10 or 14 days, while hot weather accelerates set but introduces durability risk if water was added on-site to manage workability during the pour.[16] Understanding how structural steel components transfer column base loads through anchor bolts into the slab reinforces why hitting that strength threshold before erection begins isn't negotiable — undertorqued anchor bolts in green concrete can shift column bases and compromise frame alignment before a single bay is plumb.
Separately, crane operations carry their own weather gate: wind restrictions typically cap lifts at 25 to 35 mph, making steel erection one of the most weather-sensitive phases on the entire critical path.[17] Scheduling pours early in the week gives you a practical buffer — if Thursday or Friday reveals a weather problem for the following week's erection window, you have days to adjust crane booking and crew logistics rather than hours.[17] The pre-pour inspection creates its own scheduling dependency: run it one full day before the pour, not the morning of, because a failed inspection at 6 AM with trucks already dispatched means an expensive restart that pushes both the cure window and the erection date backward.[17] For any 20×40 building slab and erection sequence, treating the cure window and the erection weather window as linked schedule items from day one — not reacting to conflicts after concrete is already placed — is what keeps the project within budget and on schedule every step of the way.
Implementing Real-Time Monitoring and Problem-Solving
Traditional quality monitoring during a pour relies on supervisors walking the site intermittently, but visual inspection is inherently subjective, frequently blocked by formwork and equipment, and gives you no way to catch placement violations — excessive free-fall height, concrete poured directly against vertical forms, vibrator insertions that are too shallow or too brief — until the forms are stripped and the damage is hardened in place.[20] Sensor-based monitoring closes that gap. Attaching ultrasound positioning sensors to the pump hose and electromagnetic sensors to the vibrator shaft lets a monitoring system track exactly where concrete is deposited, how deep the vibrator is inserted, how long each insertion lasts, and whether the vibrator head gets too close to form faces — all in real time.[20] When any of those parameters fall outside the accepted thresholds, the system sends an alert to the site manager before the problem becomes permanent, rather than after.[20] For a 20×40 building slab and erection project where anchor bolts and embedded sleeves are already positioned, catching an undervibrated zone beside a bolt cluster while the concrete is still plastic takes seconds to correct; discovering the same defect during demolded inspection takes days and costs real money.
Beyond vibration quality, the more consequential gap in conventional pour monitoring is that standard cylinder break results — the typical proxy for slab strength — don't accurately reflect what's happening inside the mass concrete itself.[18] Standard 4×8 field cylinders lose hydration heat quickly and cure close to ambient conditions, while mass concrete in a slab retains heat and gains strength faster; the two diverge enough that cylinder tests consistently understate actual in-situ strength.[18] AI-driven piezoelectric sensors embedded directly in the slab address this by measuring electromechanical impedance signals that shift as concrete stiffens during curing, producing strength predictions tied to the actual slab rather than a proxy sample.[18] Field validation across four U.S. highway construction projects showed prediction accuracy within approximately 15% of standard compression test results, meeting engineering acceptance margins without destructive testing or manual intervention.[18] For your erection schedule, that matters: when sensor data confirms the slab has reached structural strength ahead of the cylinder break window, you can mobilize the erection crew days earlier — keeping the project within budget and protecting the crane window you've already booked. Continuous quality control testing for temperature and slump must still run on every arriving truck throughout the pour, because no monitoring system substitutes for verifying that the delivered mix itself stays within specification before placement.[19]
Synchronizing Steel Erection and Final Finishing
Tie your erection crew's mobilization date to actual concrete strength data rather than the calendar, since cold weather and slab thickness shift timelines unpredictably.
Aligning Erection Crew Activities with Curing Times
Mobilizing your erection crew on the right day comes down to understanding what concrete is actually doing during the cure window — and what threshold makes it safe to load.
Curing isn't drying; it's hydration, a chemical reaction where Portland cement compounds combine with water to form calcium silicate hydrate (C-S-H), the gel structure that gives hardened concrete its compressive strength and durability.[22] That reaction continues well past the first week, which means strength at day 7 is meaningfully different from strength at day 14 or day 28. For a 20×40 building slab and erection sequence, the practical baseline is a minimum of 7 days before frame assembly begins, though full design strength develops over several additional weeks — and the timeline shifts with weather conditions and slab thickness.[21] When it comes to applying structural loads, most structural engineers require 60-75% of 28-day design strength before construction loads go on precast footings, with approximately 50% as the lower threshold for starting significant construction above a footing.[23] Cold temperatures slow the hydration process and can push even a straightforward 7-day schedule out by several days, so the erection crew's mobilization date needs to stay tied to actual strength data rather than a fixed assumption on the calendar.[21] Anchor bolts are already cast into the slab from the pour itself — the steel frame mounts directly to those embedded bolts once sufficient strength is confirmed, so the only variable between a ready slab and a started erection is how quickly you verify and act on the strength data in hand.[21]
Conducting Inspections to Guarantee Structural Integrity
Inspection authority matters as much as inspection timing. Do not pour concrete until you have written sign-off from both your structural engineer and the building certifier — verbal confirmation from either party carries no legal weight, and pouring without documented approvals can trigger non-compliance orders, demolition requirements, and insurance voids that dwarf any schedule time you thought you saved.[24] Before that sign-off happens, walk every inspection point methodically: verify that anchor bolt locations match the fabricated frame layout exactly, confirm reinforcement bar sizes and spacing against the structural drawings, and check that concrete cover on every rebar element meets specification.[25] One precision technique worth adding to your pre-pour process — create a physical template based on the steel column base plates and hold it over the bolt pattern to catch misalignments before the pour, not during strip or erection.[25] Document every verification step with photographs from multiple angles; those images become your defense record if any element is questioned during the certifier's inspection or during future owner disputes.[25]
Once the slab has cured and steel erection begins, the inspection focus shifts from embedments to connections. Every weld joining beams and columns must be examined against the connection details in the engineer's drawings, because weld quality directly determines load-bearing capacity — a connection that looks complete from a distance can still be undersized, underpenetrated, or mislocated relative to the force path it needs to carry.[25] Hold a pre-fabrication meeting with your steel supplier and erector before the first piece arrives on site: aligning on quality standards, reviewing shop drawings face-to-face, and establishing clear communication channels at that stage prevents field conflicts that cost far more to resolve mid-erection than they would have to address on paper.[25] After forms are stripped from any embedded concrete elements, a cover meter gives you non-destructive confirmation that rebar placement held its position through the pour — a quick, low-cost verification that closes the loop between your pre-pour inspection record and the finished foundation your frame is now bolted to.[25]
Delivering Service Excellence through Post-Erection Support
The warranty structure behind your steel building matters as much after erection as your slab design matters before the pour.
Structural warranties from credible suppliers run 40 to 50 years on the primary frame — the most material-intensive and expensive component of the building — while suppliers who only pass through a one-year manufacturer's warranty are signaling limited long-term accountability.[26] A warranty backed by the building company itself, not just the fabricator, is what actually protects you: a fabricator can close down in year 12, but a company-backed structural warranty still holds as long as the issuing company stays in business — which is exactly why the supplier's track record matters as much as the warranty term printed on paper.[26] On top of structural coverage, a complete post-erection package includes separate coverage for painted surfaces — up to 40 years on Kynar-finished steel panels — plus roof warranties that run 25 years for Galvalume systems and 20 years for standing seam, each issued independently of the structural warranty so a roofing claim doesn't interact with frame coverage.[26] No-dollar-limit weathertightness protection, available through certified installer programs, adds another layer of long-term accountability — but access to NDL coverage depends on documented inspection requirements being met and the installer holding verified certification credentials, so your choice of erection contractor determines not just build quality but the warranty depth available to you after the project closes.[27] Engineer-stamped plans and detailed installation documentation delivered at project close give you a complete reference package for every future modification, code inspection, or warranty claim — so the support relationship doesn't end when the erection crew drives away, and you're never starting from scratch when the building needs to grow or change.[28]
- Lock in building scope before design begins–use, doors, insulation, utilities–to compress timeline by 2-4 weeks.
- Geotechnical investigation ($2,000-$5,000) prevents costly foundation failures; skip it and discover soil problems after mobilization.
- Anchor bolt placement must match fabricated frame exactly; misalignment delays erection and requires expensive slab modifications.
- Verify slab reaches 75% of 28-day strength before erection begins; cold weather extends cure 10-14 days, not 7.
- Sensor-based pour monitoring catches placement defects in real time; standard cylinder tests underestimate actual slab strength by 15%+.
- Single-source coordination (one GC handling civil, concrete, and steel) compresses schedules 15-25% versus fragmented subcontracting.
- Structural warranties from the building company itself (40-50 years) protect you long-term; fabricator-only warranties disappear when companies close.
- https://www.builtbyad.com/learning/how-long-does-it-take-to-build-a-metal-building
- https://www.structuremag.org/article/strategies-for-better-delegated-design-in-structural-steel/
- https://en.grupoadipsa.com/bim-coordination-guide/
- https://questarconstructiontx.com/blog/
- https://iac-intl.com/industrial-concrete-construction-foundations/
- https://terrapincg.com/commercial-construction-process-project-delivery-2026
- https://wrightconstructioninc.com/post/slab-on-grade-construction-guide-design-build/
- https://projul.com/blog/construction-soil-testing-guide/
- https://projul.com/blog/construction-concrete-best-practices-guide/
- https://www.worldwidesteelbuildings.com/blog/how-to-pour-a-concrete-slab-foundation-for-metal-building/
- https://wrightconstructioninc.com/post/commercial-concrete-construction-process-step-by-step/
- https://verdeterrecontracting.com/underground-utility-construction-101-with-scope-sequencing-and-common-pitfalls/
- https://wbprimeconstruction.com/contractor-blog/essential-steps-for-construction-site-preparation/
- https://www.knightscompanies.com/optimizing-construction-timelines-through-integrated-ready-mix-concrete-and-pumping-service-coordination/
- https://drakereadymix.com/choosing-the-right-concrete-mix-for-your-project/
- https://projul.com/blog/construction-elevated-slab-formwork-guide/
- https://www.xshift.ai/blog/construction-crew-scheduling-guide
- https://www.nature.com/articles/s41467-025-67168-8
- https://bfs-industries.com/blog/concrete-pouring-checklist/
- https://link.springer.com/article/10.1007/s43503-022-00003-x
- https://www.mammothmetalstructures.com/concrete-services-for-metal-buildings
- https://concretepourchecker.com/guides/aci-318-25-complete
- https://www.eng-tips.com/threads/how-long-should-you-wait-to-load-a-concrete-footing.218610/
- https://imaginekithomes.com.au/guides/owner-builder-s-pre-pour-slab-inspection-checklist-for-steel-frame-kit-homes-mm1mlwj7/?srsltid=AfmBOoqnVHV45b4Ng3ETaaU-IXX5ykjCiL2xW5v61HYRVComaJnYtcMF
- https://iconsteelbuildings.com/construction-quality-control-checklist/
- https://csisteelbuildings.com/about-capital-steel/capital-steel-warranties
- https://www.kirbybuildingsystems.com/resources/warranties/
- https://armstrongsteel.com/buildings/garage-steel-buildings