
We walk you through every phase of steel building ownership–from site prep and foundation work through assembly, weatherproofing, and long-term maintenance–so you understand exactly what happens before, during, and after your kit arrives. Proper sequencing, correct fastener placement, and adherence to PE-stamped drawings keep your structure sound, leak-free, and warranty-protected for decades.
Why DIY Steel Buildings Are Booming: Cost, Speed & Strength
Prefabricated steel components arrive pre-cut and pre-drilled, letting your crew bolt them together on-site and cut labor costs by roughly 50% compared to traditional construction.
Prefabrication Cuts Labor Costs by Up to 50%
Factory prefabrication is where your labor savings actually originate.
Components arrive pre-cut and pre-drilled, so your crew bolts them together on-site rather than measuring, cutting, and fitting from scratch — a shift that directly slashes the skilled man-hours your project consumes.[3] That efficiency compounds fast: metal frame buildings cost approximately 50% less than traditionally built structures, with the bulk of that gap driven by reduced labor rather than cheaper raw materials.[2] Depending on project scope, prefabricated steel buildings deliver 20-30% savings on total construction costs, with assembly running 30-50% faster than conventional methods.[1] Fewer days on-site also mean lower overhead — equipment rentals, site supervision, and temporary facilities — costs that quietly inflate traditional project budgets and push final numbers past estimates.
For a warehouse, hangar, or agricultural facility where staying within budget is non-negotiable, understanding the full labor and material cost picture before you order your DIY metal building kit is the single most actionable step you can take.
Galvalume(TM) Steel Delivers a 50-Year Rust-Perforation Warranty
Galvalume combines steel with a coating of 55% aluminum, 43.5% zinc, and 1.5% silicon — the aluminum forms a self-repairing oxide barrier at any surface scratch, while the zinc sacrificially protects any exposed steel edge.[5] In independent salt spray and cyclic corrosion tests, Galvalume consistently outlasts standard galvanized steel by two to four times under identical exposure conditions.[5] That durability now backs a 50-year rust-perforation warranty on painted AZ50 Galvalume panels — a significant jump from the previous 25-year industry standard, following US Steel's warranty expansion announced in January 2023.[4] Typical field service life runs 40 to 70 years depending on environment, installation quality, and maintenance.[5] Two use cases require a different substrate: enclosed livestock buildings where manure breaks down into ammonia over time, degrading the coating, and coastal sites where persistent salt air accelerates surface wear — if your project involves animal housing, flag it during the spec phase so the right material gets called out from the start when planning your steel frame farm building.[4] For warehouses, hangars, retail spaces, and dry agricultural storage in inland climates — the vast majority of steel building applications — Galvalume panels deliver the longest service life with the lowest maintenance overhead.[5]
Engineered Kits Slash Build Time to a Single Weekend
For compact structures — storage units, small workshops, agricultural outbuildings — a four-to-seven-person crew can complete erection in a single day to a few days.[6] That speed is engineered into the kit itself: every component arrives pre-cut, pre-drilled, and sequenced as a coordinated package, so there is no on-site measuring, cutting, or welding once the truck leaves.[6] Complexity is the primary variable — simple rectangular buildings with standard rooflines assemble fastest, while additional framed openings, roof extensions, or non-standard features each add steps and time.[6] Equipment is the other lever: forklifts or scissor lifts move 10-foot panels in minutes, but without them progress slows and safety risk rises sharply.[6] Medium-sized buildings typically run one to two weeks for frame assembly, with roof and wall panels adding roughly another week and doors, windows, and accessories taking two to three days after that.[7] Two preparation steps prevent most first-day delays: read the full installation manual before your kit arrives, and confirm lifting equipment is reserved before delivery day.[6] You can track exactly what happens between order placement and components hitting your site in the prefab building kits delivery timeline.
Smart Site & Kit Prep: From Dirt Pad to Delivery Day
Call 811 before breaking ground, then nail soil compaction within ½ inch tolerance–because unstable ground cracks slabs and binds doors within the first season.
Utility Marking & Soil Compaction Checklist
Before any ground breaks, call 811 to have underground utilities flagged across your entire footprint — buried electric lines, gas mains, and water pipes have halted projects mid-dig, and the service is free.[10] From there, soil compaction is the variable most buyers underestimate: unstable ground causes slabs to crack, drainage to pool beneath base rails, and doors to bind within the first season.[9] The acceptable tolerance is tight — finished grade across the entire site must stay within ½ inch, or the steel frame above it starts life on a compromised base.[9] If the ground is soft, recently backfilled, or sloped, soil grading — adjusting slope and density before any concrete is placed — is required before foundation work begins.[9] Once grade is confirmed, rough in all utilities (electrical conduit, plumbing lines, HVAC sleeves) before the slab goes down; cutting into cured concrete to add them later inflates labor costs well beyond what pre-pour installation would have run.[8] Finally, verify that the access path from your property entrance to the pad can carry a loaded flatbed — soft ground during wet season can stop a delivery truck cold, adding recovery costs and pushing your schedule back when you can least afford it.[8] If you want to understand how slab thickness decisions affect your total budget before reaching this stage, the 30×40 concrete slab cost breakdown walks through pricing per square foot by use case.
Leveling Techniques That Prevent Future Wall Stress
Once grade is confirmed and your slab has cured, leveling shifts from a site task to a precision assembly task — and the tolerance is tighter than most first-time builders expect.
Steel buildings concentrate load at each column point rather than spreading it evenly, so a deviation as small as 0.5 inches (13 mm) at the base rail creates stress concentrations that ripple up through every welded and bolted connection above it.[11] Start with a laser level across the entire foundation surface before positioning base rails, then use a spirit level along the length and width of each rail after placement — but don't fully tighten anchor bolts yet.[11] Keeping nuts snug rather than torqued leaves you room to correct minor irregularities using metal or plastic shims slipped beneath the rail at low spots, a fix that costs minutes now versus re-drilling anchor bolt locations later.[11] Once rails are shimmed level, run a string line from front to back along each side post line; any misalignment greater than 0.25 inches (6 mm) will show immediately.[11] For frames that read level but sit slightly out of square, drive a stake roughly 2.4 metres from the building and use a ratchet strap clamped to the post to pull the frame into true alignment before final tightening.[11] Only after confirming level, square, and plumb on all base rails should you torque anchor bolts to spec — at that point, the geometry is locked, and every arch, purlin, and panel you install above it inherits a clean baseline that keeps doors operating smoothly and wall panels sealed for decades.[11]
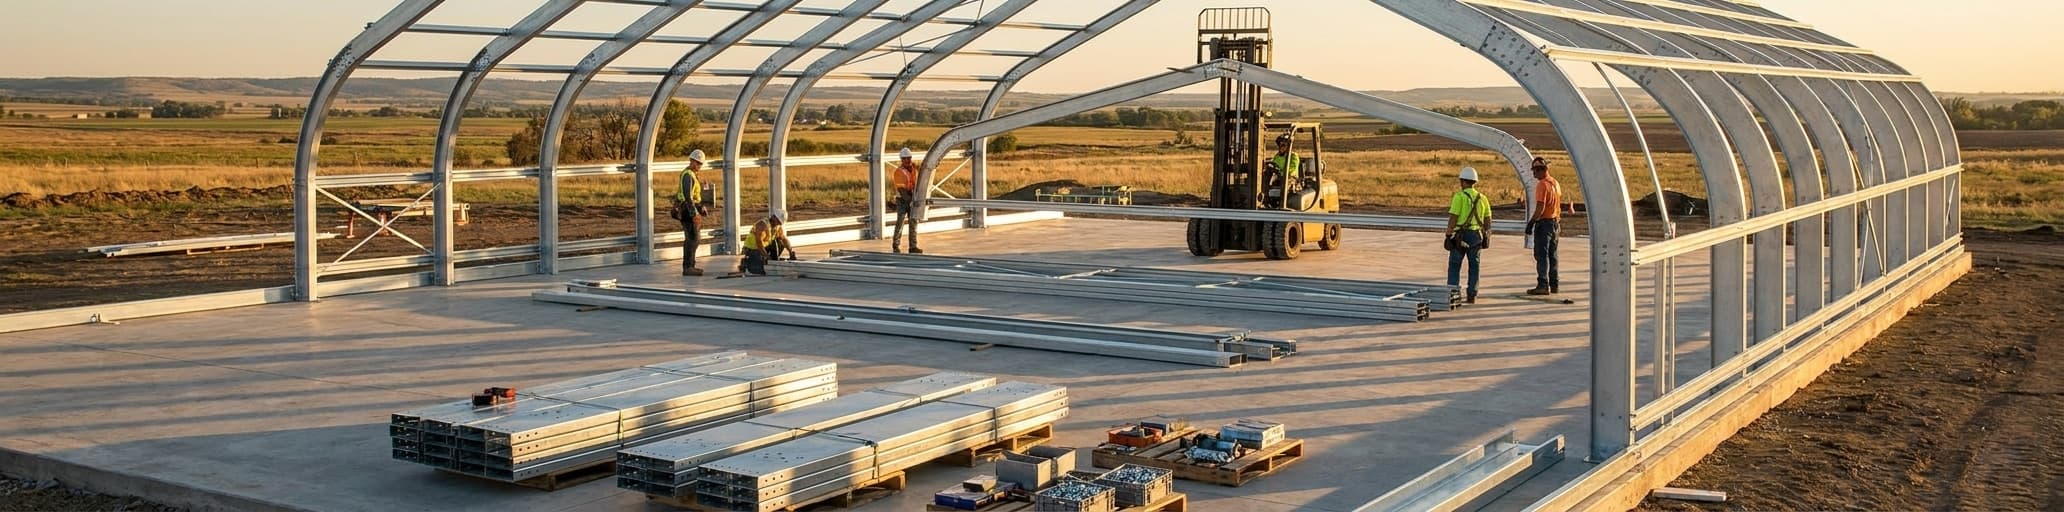
Inspecting Your Pre-Cut, Pre-Drilled Components on Arrival
The moment the delivery truck pulls in, your job shifts from site prep to documentation.
Have a digital camera ready before any material leaves the flatbed — photograph every damaged crate or bundle and capture the part number in the frame so your supplier can identify and replace it without back-and-forth.[12] Mark each damaged item on the Bill of Lading and get the driver to initial it; the driver handles transport only, not replacement, so your written record is the only leverage you have once the truck rolls away.[12] While unloading, run a full crate inventory and note it on the Bill of Lading before you sign off — skipping this step means missing parts surface mid-assembly, when schedule pressure is highest and delays cost the most.[13] Low-cost kits carry a specific risk at this stage: pre-drilled holes that don't align and frame members undersized for your load, defects that only reveal themselves when you try to bolt components together.[13] You have two weeks from delivery to complete a thorough count of every panel, trim piece, fastener, bolt, and accessory; after that window closes, suppliers treat shortages as site theft rather than a shipping error.[12] Any missing or damaged parts identified within that window get manufactured to order and shipped — your components were custom-cut for your specific building, so flag problems early and give your supplier enough lead time to correct them before your crew is standing idle.[12] If you want a clear picture of exactly which components should be in the crate before delivery day, reviewing a metal building kit contents breakdown gives you a line-by-line reference to check against.
Step-by-Step Assembly: Instructions You Should Never Ignore
Skip the assembly sequence and you'll face geometry problems requiring complete disassembly, but following each step in order takes only minutes longer and saves hours of rework.
Sequence Order: Base Rails, Arches, Peak Brackets
The assembly sequence is engineered to be followed in order — skipping ahead creates geometry problems you can't fix without disassembling what you just built.
Start with base rails: slide them over anchor bolts, hand-tighten nuts only, then confirm level and square before any final tightening.[11] Shim low spots now using metal or plastic shims — a correction that takes minutes at this stage costs hours once arches are standing.[11] Before lifting begins, organize all components near the foundation in assembly order; individual arch frames weigh roughly 50 pounds each, so use a forklift to move pallets rather than carrying components by hand.[11] For buildings up to 20 feet wide, two people can raise the assembled frame manually into position, but any structure 30 feet wide or larger requires a mechanical reach forklift to safely maneuver the frame vertical without bending wall posts out of tolerance.[11] Once each arch seats into the base rail risers and plumbs to within a 0.25-inch (6 mm) tolerance, fasten wall posts to risers with screws — but hold final torque until peak brackets are in place.[11] Peak brackets complete the structural triangle: mark the exact center of the peak component and collar-tie assembly first, then attach flat brackets to both the front and back faces of each connection, which keeps the frame perpendicular under load.[11] With peak brackets set, run a string line front-to-back along each side post line; any frame that has drifted out of plane shows immediately, and a ratchet strap clamped to a post and staked roughly 2.4 metres out pulls it back into true alignment before you torque the final bolt.[11] If you want a deeper look at how each of these members transfers load from peak to foundation before you start, the structural steel components overview gives you the load-path context that makes the sequence make sense.
Screw Patterns That Stop Leaks Before They Start
The single biggest cause of metal roof leaks is incorrect fastener installation — not panel quality, not weather exposure, not material failure.[14] Every panel profile has its own placement diagram inside the installation guide, and those rules differ enough between panel types that mixing them up creates leak points you won't find until the first heavy rain. For ⅞" corrugated roofing, screws belong in the HIGH of the panel, not the low: a fastener sitting in the low position sits directly in the water path, and any screw that backs out even slightly under thermal cycling opens a leak channel.[14] Corrugated roof panels use four screws per screw line, spaced so every third corrugation carries a fastener, with one screw always placed at the panel overlap.[14] R-Panel follows a different count — five panel screws plus one lap screw at panel ends, dropping to three panel screws plus one lap screw on interior screw lines, with lap screws running 12" to 18" on center.[14] 7.2 Panel and Western Rib place screws in every panel low: five panel screws and one lap screw per screw line, same 12"-18" lap screw spacing.[14]
Screw line spacing — the distance between rows — runs 24" on center for the majority of installations over solid wood substrates, though high-wind or heavy-snow regions typically call for 18" O.C.[14] Six variables actually govern that spacing decision: panel gauge, profile depth, substrate type (steel purlins grip tighter than wood and allow wider spacing), roof shape and pitch, building eave height, and geographical location — a coastal hangar and a Midwest warehouse can use identical panels but require different fastener patterns.[15] Tighter spacing is not automatically safer; every additional penetration is a potential leak point, so the pattern should match the calculated load rather than exceed it arbitrarily.[15] For buildings in open terrain, at elevation, or on coastlines, consult your panel manufacturer's load tables and, where building codes require it, a licensed structural engineer to confirm the pattern before you drive a single screw.[15]
Sealant closes the gap between correct spacing and genuine weathertightness. Apply butyl or mastic tape at every panel sidelap on roof conditions — on slopes below 3:12, capillary action pulls water upward between overlapping panels when storm-driven pressure differentials create internal suction, bypassing even correctly driven fasteners.[15] Wall panels benefit from mastic tape at the sidelap as well; many crews skip it on siding, but for agricultural facilities, aviation hangars, or any structure exposed to wind-driven rain, that shortcut surfaces as a water intrusion callback within a few seasons.[14] Get the pattern right, drive screws to proper compression without over-torquing the neoprene washer flat, and apply sealant at every lap — those three steps account for the overwhelming majority of leak-free metal roofs.
Why Field Alterations Void Engineering Certification
Every pre-engineered steel building ships with drawings bearing a Professional Engineer's stamp — that stamp is the engineer's formal certification that the specific design, as drawn, meets applicable load requirements and code standards.[17] Professional accountability runs in one direction: by affixing the seal, the PE accepts responsibility for that exact configuration and nothing beyond it.[17] Cut an opening where no header was designed, relocate a column to gain equipment clearance, or add a ridge vent the drawings don't show — and you now have a structure the PE never reviewed, which means the stamped documents no longer describe what's actually built.[17] That gap matters legally: in most jurisdictions, engineering documents must bear an authorized PE stamp to satisfy a building department, and drawings that no longer match the as-built condition fail that requirement.[17] One buyer's experience makes the stakes concrete: purchasing a building engineered to IBC 2012 when the local authority enforced IRC 2015 left them unable to secure a permit at all — a mismatch that only surfaced after the down payment was made.[16] A field alteration puts you in the same position, except the conflict is between your approved drawings and the structure standing on your slab rather than between two code editions.[17] The fix costs far less than a failed inspection: if any change — a framed opening, a relocated door, an added lean-to — isn't on the original stamped drawings, contact your supplier before you make the cut, obtain revised PE-stamped drawings for the modified scope, and submit them to the building department.[17] That sequence keeps a prefab warehouse, hangar, or agricultural facility covered from permit issuance through final inspection — and preserves the engineering certification your lender and insurer both require.[17]
Safety & Tooling Essentials for First-Time Builders
Replace hard hats immediately after any impact, and discard gloves with holes or punctures on the spot to maintain the protective equipment OSHA requires.
Head-to-Toe PPE: Cut-Resistant Gloves, Steel-Toe Boots, Hard Hat
Steel panel edges cut through unprotected skin on contact, and a single arch frame rolling off a stack can shatter an unprotected foot — these are exactly the mechanical hazards OSHA's 1910.132 standard addresses, requiring protective equipment wherever injuries from physical contact are possible.[18] For hand protection during panel handling, leather, canvas, or metal mesh gloves guard against cuts, punctures, and burns from pre-cut steel edges; discard any glove with holes or punctures immediately, since a compromised glove offers no meaningful cut resistance.[20] Steel-toe or impact-resistant footwear handles foot protection: falling base rails, rolling frame members, and fasteners scattered across a cured slab are all live hazards during erection, and puncture-resistant soles add a second layer of defense during the screw-down phase.[20] Hard hats are mandatory throughout assembly — overhead hazards during steel building erection include tools dropped from height and arch panels swinging during mechanical lift; if a hard hat absorbs any impact, replace it immediately even when the shell looks intact, since the protective foam liner compresses invisibly and no longer absorbs a second blow.[20] Fit matters as much as the equipment itself: PPE that slips, binds, or doesn't seat correctly fails the OSHA requirement that all personal protective equipment fit each affected employee properly, and any defective or damaged item must be pulled from service on the spot.[18][19] For owner-operators and self-employed crews, the standard applies equally — you're responsible for confirming that every piece of equipment meets ANSI standards and stays in clean, reliable condition from the first anchor bolt to the final fastener.[19]
Lifting & Bending Techniques for 10-Foot Panels
A 10-foot steel panel follows the same handling logic as any large-format sheet good: get as close to the panel as possible before initiating the lift, drive the raise with your legs rather than your back, tilt the panel toward you to find its center of gravity, then bring it level before moving.[23] The 50-lb solo threshold is the hard line you don't cross — exterior wall assemblies longer than 12 feet exceed 250 lbs, which means you either put enough crew members on the panel so no single person carries more than their share, or you use a mechanical lift to handle it entirely.[23] One-person and two-person panel carriers with purpose-built handles eliminate the awkward grip problem that causes most panel drops during the carry phase; a drywall dolly or adjustable panel dolly on pneumatic tires keeps the panel off the ground and moves it across the slab without straining any one worker.[23] When you must change direction while carrying a panel, pivot with your feet — not your torso; the rotational load on the spine increases sharply when you twist while holding a windage-prone sheet above waist height.[22] Bending the panels themselves is a separate hazard: a 10-foot panel supported only at its ends will sag and can take a permanent set, so carry panels on edge or move full bundles horizontally with a forklift rather than letting them bow under their own weight.[23] Where powered equipment is available — forklifts, skid steers, cranes with proper sling inspections — use it; mechanical handling eliminates unnecessary manual lifts, moves panels directly to the work area, and reduces cumulative physical stress across a multi-day erection schedule.[21]
Weather Rules: Wind Speed and Precipitation Limits
Two wind speed numbers govern every erection day, and both come directly from OSHA's definition of high wind. General construction stops at 40 mph — at that speed, wind creates hazards your standard safety controls can't offset.[26] Drop that threshold to 30 mph the moment your crew picks up panels or any large-format material: a 10-foot steel wall panel above 30 mph becomes a sail that pulls workers off balance and can slam into standing frame members hard enough to bend connections out of tolerance.[26] These are hard stops, not judgment calls. Mark both thresholds on your project weather plan before erection day so no crew member is making a go/no-go decision in the field under schedule pressure.
Those assembly thresholds are separate from the wind load your finished building is engineered to withstand — and that second number is set by your county's code before your kit ever ships. Coastal and Gulf states including Florida, Texas, Louisiana, and the Carolinas regularly require structures rated for 130 to 170 MPH sustained loads.[24] Your specific requirement depends on your FEMA wind zone designation, your site's exposure category (open farmland catches significantly more wind than a sheltered inland lot), and state-level code — Florida's standards are among the strictest nationally, with Miami-Dade and Broward counties requiring 150-170 MPH certification in many cases.[24] Before you place an order, request wind load certification documentation and PE-stamped drawings that confirm your building is engineered for your zip code's requirement; a rating mismatch can block permit approval entirely, a problem that surfaces only after a down payment is made.[25] If you're building in a coastal state where Florida hurricane ratings apply, confirm the exposure classification on your drawings matches your actual site conditions — open coastal land and sheltered inland lots are classified differently and require different framing specs.[24]
Precipitation rules during assembly are simpler but equally firm. Any rainfall that reduces footing traction or limits visibility enough to create a fall hazard triggers the same work-stop logic as high wind — wet steel panels are slippery, and wet concrete is a fall surface, not a work platform.[26] If your delivery lands during a wet stretch, keep panel bundles elevated off the ground on blocking, store fasteners and trim under cover, and confirm your slab has reached full design strength before base rails go down; fresh concrete that absorbs rain water before curing is complete can compromise surface strength and reduce anchor bolt pullout values — the exact connection that holds your frame to the foundation under every wind load your building will ever see.[24]
Next Steps: Customization, Codes & Long-Term Value
Add insulation between purlins without structural modifications, then secure it with seam tape and banding wire to preserve R-value permanently.
Insulation, Doors, Skylights That Retrofit Later
The clear-span steel frame that makes a metal building fast to erect is equally forgiving when you need to add insulation after initial construction. Vinyl-faced fiberglass insulation rolls from R-8 through R-30 install between purlins without any structural modification to your frame.[28] Your facing choice drives the real performance decision: WMP-VR-R+ facing — tri-directional scrim with metalized polyester backing — is the top DIY choice and provides superior vapor control in high-humidity environments like livestock facilities and coastal warehouses, while PSK/WMP-10's Kraft-side construction wrinkles less over time and holds up well in dry inland climates.[28] Active work environments such as aviation hangars and industrial warehouses call for WMP-50, the highest-tensile facing available, engineered to resist surface damage in high-abuse conditions.[28] Regardless of facing, finish every installation with seam tape at panel joints and banding wire to secure the blanket to purlins — compressed insulation loses R-value permanently and won't recover once weight is on it.[28]
Door retrofits are the second major post-erection upgrade, and steel framing handles them cleaner than wood construction. Man doors (service doors) cover daily foot traffic without requiring you to cycle a large opening; overhead doors scale from standard residential clearances up to commercial-grade spans for vehicles and equipment, with manual or Bluetooth-capable automatic openers available.[27] Sliding barn doors remain the preferred choice for wide agricultural access — a combine or loaded hay wagon doesn't wait for a roll-up panel to clear.[27] With hybrid steel-and-wood framing, cutting new door openings after initial erection requires minimal additional reinforcement, making later additions genuinely practical rather than just theoretically possible.[27] Pre-engineered framed openings specified at the kit stage are still the faster and cheaper path: the opening is accounted for in the original PE-stamped drawings, which means no revised engineering drawings, no permit amendment, and no field-cut headers to source.[27]
Skylights and transom windows solve the one limitation steel panels can't address on their own — interior natural light. Transom windows placed at the upper wall section bring daylight in while keeping privacy and security intact at eye level, a practical detail for workshops, retail spaces, and barndominium living areas.[27] Skylights require a deliberate cutout in the roof panel; specifying the location during your kit order lets the supplier pre-frame the opening, which costs far less in time and materials than field-cutting a hole in a standing seam roof after erection is complete.[27] Dormers go further still, adding headroom and daylight to lofted areas or living quarters when your use case demands it.[27] Any of these features that aren't on the original stamped drawings require revised PE documents before you cut — the same rule that applies to door openings and framed vents — so flag your skylight or dormer location during the spec phase, get it into the drawings, and the retrofit becomes a planned upgrade rather than a code problem.
Local Permit & Wind/Snow Load Codes Demystified
Building codes govern every steel structure in the U.S., covering live, dead, snow, wind, and seismic loads specific to your county — without them, you'd be guessing how to construct safely for local conditions, and a single moderate storm could test those guesses with costly consequences.[29] The International Building Code (IBC) forms the national baseline, but local jurisdictions layer on their own requirements, so a coastal Florida county and a Midwest agricultural district can demand dramatically different engineering specs from identical building footprints.[29] Snow loads alone swing from roughly 10 psf in southern states to over 70 psf in northern regions, while coastal and Gulf areas routinely require sustained wind resistance of 150 mph or higher — numbers set by ASCE wind maps and enforced locally.[31] Your site's exposure category — B for urban or suburban surroundings, C for open terrain, D for coastal or waterfront locations — directly changes how wind load is calculated and what framing and anchoring your building requires, even if the panel spec looks identical to a neighboring site.[30] Incorrect load assumptions, even small ones tied to the wrong geographic zone, cause permit rejections and force structural redesigns after fabrication — one of the most expensive problems to fix on a pre-engineered kit where every member was cut for a specific load path.[30] Permit costs run from $150 in small towns to $7,500 in major metros, with the national average landing between $550 and $2,000 depending on building size and complexity; that permit must be approved before any ground breaks, because building without one puts you at risk of fines, stop-work orders, and a structure your insurer won't cover.[29] For occupancy types like aviation hangars and commercial retail spaces, commercial permits apply and trigger more rigorous inspection cycles — including sub-permits for electrical, plumbing, fire suppression, and foundation work — than a standard residential permit.[29] Your building supplier should provide PE-stamped drawings confirming code compliance for your specific zip code; that package is what your building department, lender, and insurer all require before your project moves forward, and it's the fastest way to clear permitting without back-and-forth submittals.[31]
Maintenance Tips That Protect Your 50-Year Warranty
The 50-year rust-perforation warranty on Galvalume panels isn't self-executing — it requires one non-negotiable annual task: wash the entire building surface with water and mild detergent to remove salt, bird droppings, and industrial dust.[34] Skip that step for a season, and the manufacturer can deny your claim on the grounds that corrosive deposits sat on the coating long enough to cause damage you could have prevented.[34] Paint warranties compound that requirement — most are split across three separate protections covering chalking, fading, and adhesion — and high-UV or coastal environments accelerate all three failure modes, meaning regular wash-downs aren't discretionary upkeep, they're your documented proof that you held up your end of the contract.[34] One distinction worth locking in now: surface rust — small orange streaks around a fastener — is a maintenance issue the warranty doesn't cover; what it does cover is perforation, meaning rust that eats completely through the metal, a structural failure that only happens when surface degradation goes unaddressed for years.[34]
The inspection cadence that keeps a building claim-ready follows a predictable year-by-year pattern. In Year 1, focus on seals, fasteners, and panels for settling movement, clean gutters and downspouts, and check insulation and ventilation for moisture accumulation — installation imperfections show up in the first twelve months if you're looking for them.[33] By Year 5, shift attention to structural connections, doors, windows, and drainage grading around the foundation, where thermal cycling and load have had time to work fasteners loose or shift frame geometry.[33] At Year 10, a full structural and connection audit is the right call, along with recoating or repainting protective finishes — this is when coating degradation becomes visible, and addressing it proactively costs a fraction of waiting until bare steel is exposed.[33] With proper care across that cycle, a steel building can last 50 to 70 years or more.[33]
Two categories of problems signal you're falling behind: visual and operational. Rust stains around joints, blistering or peeling paint, and water stains on interior insulation all indicate active coating failure.[33] Doors or windows that stick or no longer seal point to frame shifting — small alignment changes that let moisture and pests inside before any structural damage is visible.[33] Unauthorized modifications — a field-cut opening, a lean-to added without revised PE drawings — void your structural warranty entirely because they alter the load path the engineer originally certified.[34] If you suspect a leak before any of these signs appear, test it section by section with a garden hose working from the bottom of the building upward while someone inside watches; many suspected leaks turn out to be condensation, which insulation or ventilation resolves without any warranty claim at all.[32] For agricultural facilities where ammonia exposure or heavy wash-down cycles are routine, the maintenance timeline compresses further — the agricultural steel building maintenance guide breaks down which inspection tasks actually matter for farm structures versus which ones waste time. Keep a dated maintenance log from the day your building goes up: that paper trail converts a warranty claim from a dispute into a reimbursement.[33]
- Prefabricated steel buildings cost 50% less than traditional construction, with assembly 30-50% faster due to pre-cut components.
- Galvalume coating outlasts standard galvanized steel by 2-4x and now carries a 50-year rust-perforation warranty.
- Foundation tolerance of +/-½ inch is critical–deviations as small as 0.5 inches at base rails create stress concentrations throughout the frame.
- Incorrect fastener placement is the single biggest cause of metal roof leaks; screw position varies by panel profile and must match installation diagrams exactly.
- Field alterations without revised PE-stamped drawings void your structural warranty and can block permit approval entirely.
- Annual wash-downs with mild detergent are mandatory to maintain warranty coverage; surface rust around fasteners is maintenance, but perforation is structural failure.
- Work stops at 40 mph wind for general construction and 30 mph when handling panels; wet conditions that reduce footing traction also trigger work stoppages.
- https://www.hcsteelstructure.com/pros-cons-prefabricated-steel-buildings-vs-traditional-construction/
- https://gensteel.com/resources/infographics/cost-and-construction-of-steel-frame-buildings/
- https://www.cascadingfallsinc.com/prefab-metal-building-construction
- https://sheffieldmetals.com/learning-center/sheffield-metals-now-offering-45-and-50-year-galvalume-warranties/
- https://www.englertinc.com/articles/difference-between-galvalume-and-galvanized-metal-roofing-projects
- https://bullbuildings.com/how-long-does-it-take-to-build-a-metal-building/
- https://lionbuildings.com/what-is-the-building-timeline-for-diy-metal-building-kits/
- https://buildway.com/metal-building-site-preparation-guide/
- https://www.carportsadvisor.com/blog/prepare-site-before-installing-metal-garage?srsltid=AfmBOortcKqtPrwDcwx8GcUddv7cy_i55M7M5Tx7GkpXDA_wSgh0SvKo
- https://garageshedcarportbuilder.com/site-prep-and-foundation-options-for-portable-sheds/
- https://canadianbuildings.ca/assemble-steel-building-kit-step-by-step/
- https://rapidsetbuildings.com/knowledge/faq/
- https://www.whirlwindsteel.com/2021/09/23/buying-a-steel-building-tips-to-consider-before-purchasing/
- https://www.westernstatesmetalroofing.com/blog/screws-for-metal-roofing
- https://readmetalroofing.com/metal-fastener-patterns-and-placement/
- https://www.garagejournal.com/forum/threads/mueller-building-engineered-to-ibc-2012-county-requires-irc-2015-dillema.493546/
- https://engineersealstamps.com/blogs/info/pe-stamps-expire-or-inspire-what-you-need-to-know?srsltid=AfmBOooT2aG1qeRDRiWiyZbgLL-JuBMTA7c4DHn4CRPLSUFC_PyInslr
- http://www.osha.gov/laws-regs/regulations/standardnumber/1910/1910.132
- http://www.osha.gov/personal-protective-equipment
- https://www.bigrentz.com/blog/construction-ppe?srsltid=AfmBOooH5F3oHy1piSS_NC19Dibcd1QpOGdK7Izu50yHM-zV0g4KCz-T
- https://www.greatamericaninsurancegroup.com/content-hub/loss-control/details/manual-material-handling-safety-for-construction-sites
- https://ehs.cornell.edu/campus-health-safety/occupational-safety/tool-and-machine-safety/material-handling-toolbox-safety
- https://www.elcosh.org/document/3829/d001299/Simple+Solutions+for+Home+Building+Workers%253A+A+Basic+Guide+for+Preventing+Manual+Material+Handling+Injuries.html
- https://www.nationwidesteelstructures.com/post/hurricane-rated-metal-buildings-wind-load-guide
- https://thecarportco.com/buyers-guide/wind-loads-metal-buildings-carports/?srsltid=AfmBOoqzoFhIV3LoKf0fMMGz4i1qR07fyEdb9MPG25i5EbDM-lhwRQ8p
- http://www.osha.gov/laws-regs/regulations/standardnumber/1926/1926.968
- https://miracletruss.com/accessories-custom-features/
- https://www.factorysteeloverstock.com/
- https://www.buildingsguide.com/build/metal-building-codes-permits/?srsltid=AfmBOoq4cmIo3iE3EK6vDM_njKngn4zdYBN1MKAglcJfCu26Wvj1Hdri
- https://norsteelbuildings.com/us/building-codes-permits/steel-building-codes-loads/
- https://www.aametalbuildings.com/blog/snow-load-wind-speed-requirements-for-metal-buildings-with-codes-pricing-impact?srsltid=AfmBOopISNaKjkDZEUar6PUSBRBLHnTjzJcggaDk92iX85MSCjyearSI
- https://futurebuildings.com/blog/steel-building-maintenance.html
- https://metalprobuildings.com/steel-building-maintenance-checklist/
- https://metalprobuildings.com/steel-building-warranties-whats-typically-covered/